live like tomorrow matters
Going on now:
➳ Working fulltime
➳ Tai Chi & Kung Fu
➳ New veggie garden
➳ Game: ANCH
➳ Watching: Seinfeld
➳ Raising kids x2
➳ Playing with code
Updated July 31st 2023
Website hits: by tinylytics
This website is frequently

@heyloura@heyloura.com

@heyloura: ~ cd /weblog/category/Longform
@heyloura: ~/weblog/category/Longform ls

Longform Posts

Subscribe to Longform posts via RSS

  • My App Defaults

    Guess I’ll join in the Duel of the Defaults 😄 I’ve held off since it seemed that most people were iOS users and I’m a Windows/Linux gal. But so many others have joined in and the list was fun to put together.

    • 📧 Email Client: HEY
    • 🕸️ Website: Micro.blog & Namecheap
    • 📝✅ Notes + Todos: Tiddlywiki via Tiddlyhost.com
    • 📸 Photo Management: Amazon Photos
    • 🗓️ Calendar: Outlook
    • 🎁 Cloud file storage: Onedrive
    • 👽 Contacts: The standard Android app
    • 🌐 Browser: Brave (desktop) & Kiwi (Android)
    • 💬 Chat: The standard Android app
    • 🔖 Bookmarks: Micro.blog
    • 💵 Budgeting & Personal Finance: Fudget2
    • 📰 News: Allsides
    • 🔐 Password Management: Lastpass
    • 🎨 Photo Editing: Paint.Net
    • 👩‍💻 Code Editor: Visual Studio Code or Visual Studio
    • 📚 Books: Audible (audio) + physical copy

    @robb@social.lol

     #code  #app defaults  #Longform 
  • Dev Diary 0009 - Week of November 27th

    This week I spent most of my time playing around with my blog theme. I realized I’ve been using Micro.blog for over a year now and I wanted to make some fixes to my blog theme.

    Step one: group by year

    There are several places in my blog that I wanted to group things by year. Photos being the main one, but also category pages and the archive.

    Luckily Hugo has a way to easily group a page collection by date. Here is a simplified version of my archive page. Note the .Key contains the date in the format specified by GroupByDate

    
    {{ range (where .Site.Pages "Type" "post").GroupByDate "2006" }}
    <h2 id="{{ .Key }}">{{ .Key }}</h2>
      {{ range .Pages }}
    		<article class="h-entry">
    			<a href="{{ .Permalink }}" class="u-url"><span class="dt-published" datetime="{{ .Date.Format "2006-01-02T15:04:05-0700" }}">{{ .Date.Format "2006-01-02" }}</span></a>:
    			<span class="p-name"><b>{{ .Title }}</b></span> <br/><br/>
    			<span class="p-summary">{{ .Summary | truncate 100 }}</span>
    		</article>
      {{ end }}
    {{ end }}
    

    I did something similar for the photo page as well using

    
    {{ range (where .Site.Pages ".Params.photos" "!=" nil ).GroupByDate "2006" }}
    

    I also added some anchor links at the top of my website so you can easily jump down the page to the year you want to see.

    Screenshot of my RPG blog theme that shows an orange at the top with the year 2023 and 2022 as links.

    Step Two: RPG Stats

    What’s an RPG themed blog with out some stats? Wouldn’t it be cool if those stats updated as I posted? I checked out the stats plugin by @amit and decided that my health bar would be based off my long posts, my mana bar off of short posts, stamina off of average length versus longest post and finally experience off of total number of words. You can check out his code here plugin-post-stats/layouts/shortcodes/poststats/detailed.html at main · am1t/plugin-post-stats (github.com)

    In short I used the his method to get the numbers of the different types of posts

    {{ $posts := where site.RegularPages "Type" "post" }}
    {{ $microPostsCount := float ( len ( where $posts ".Params.title"  "=" nil )) }}
    {{ $titlePostsCount := float ( len ( where $posts ".Params.title"  "!=" nil )) }}
    
    {{ $scratch := newScratch }}
    {{ $scratch.Set "longCount" 0 }}
    {{ range $posts }}
        {{ $scratch.Add "wordcount" .WordCount }}
    	{{ if ge .WordCount ($scratch.Get "longCount") }}
    		{{ $scratch.Set "longestPost" . }}
    		{{ $scratch.Set "longCount" .WordCount }}
    	{{ end }}
    {{ end }}
    {{ $postCount :=  len ($posts) }}
    {{ $wordCount := $scratch.Get "wordcount" }}
    {{ $maxWordCount := $scratch.Get "longestPost" }}
    {{ $avgPostLength := float (div $wordCount $postCount) }}

    Then I display those in various ways above my bars. Next I needed to fill the bars and to do that division without Hugo just spitting out zeros I needed to add the float. Here is the code for one of the bars and here you can view my code for all the bars.:

    <div class="bar">
      <label>Mana: {{ $microPostsCount }}/{{ math.Add $titlePostsCount $microPostsCount}}</label>
      <small>Micro Posts</small>
      <div class="rpgui-progress blue" data-rpguitype="progress">
        <div class=" rpgui-progress-track">
          <div class=" rpgui-progress-fill blue" style="width: {{math.Mul 100 (math.Div $microPostsCount (math.Add $titlePostsCount $microPostsCount))}}%;"></div>
        </div>
        <div class=" rpgui-progress-left-edge"></div>
        <div class=" rpgui-progress-right-edge"></div>
      </div>
    </div>

    So now I have stats that update as I post to my blog. Pretty neat!

    My character level is based off of how many years I’ve been blogging. The code is pretty similar to the group by year above, except I just get the number of years in the collection as a count and display it. Include the following in double braces: len ((where .Site.Pages "Type" "post").GroupByDate "2006" )

    Further thoughts

    I think it would be cool to make my own rpg themed plugin for Micro.blog that other people could add to their site. Then maybe make a webring so people could browse the Micro.blog “characters” 😆🤔

    It would also be cool to have the experience target update automatically and have fun taglines that I could put under my level.

    The final piece was adding a link to Lillihub as an option for comments. Clicking the link, assuming you are logged in, will take you right to the post with all the comments loaded and visible.

     #code  #tags-lillihub  #Longform 
  • Dev Diary 008 - Week of November 20th

    Whew... These last couple of months have been rough. This update is pretty short. I hosted Thanksgiving at my house this year so I wrapped up most dev related items by Wednesday.

    Lillihub

    I put out an update before signing off on Wednesday. It included some small fixes and photo swiping on a desktop screen as well. As I mentioned last week I used a web component library from shoelace.style to pull it off. One issue I ran into was that the component didn't render until the DOMContentLoaded event fired. As I mentioned before somewhere, I think, is that Lillihub doesn't actually fire that event until everything is streamed over from the server. Which takes ages 😆. This was a big tradeoff I took to make make everything work without JavaScript. So the images would display stacked and then snap into the carousel about 20 seconds later....

    Anyway, the fix was actually pretty simple. I needed to run the shoelace component code first and since it was of type="module" you need to add the "async" to the script tag. By putting that in the head, Lillihub starts getting the script and executing is as soon as it can. So it actually renders the components as they are streamed. Pretty neat. 🦄 No JavaScript? No problem, the images just stayed stacked.  

    <script async type="module" src="https://cdn.jsdelivr.net/npm/@shoelace-style/shoelace@2.11.2/cdn/components/carousel/carousel.js"></script>

    One of my next action steps on this project is to bundle up the three components I'm using into Lillihub and stop relying on the CDN. This is made much harder because of their use of import maps and my resistance to use a bundler. (Yes there are a lot of benefits... but I do miss the days of grabbing a single .js file, and license, and plopping it into a directory)

    I also haven't really come across too many instances where pulling the images into a carousel breaks things. By break I mean that it doesn't look right, maybe extra white space or two image dots when there is only one image. Since micro.blog pulls in blog posts via RSS, there is no standard format that post + images come over. Even among blogs hosted at micro.blog since themes can be customized. So I made a best guess and added in my own markup to the incoming post.

    The code itself is pretty straight forward and you can see it here. I find out if a post has images and then iterate through them creating the web component and then removing the original image from the DOM. For those I follow on Micro.blog this works out pretty well. There is one person who's content has malformed paragraph tags with images and those display with too much whitespace. Then the Micro.blog CDN occasionally returns blank 1x1 pixel images. But overall it works and looks great. Plus no one has emailed to complain.

    Other Dev Adjacent Things - Tiddlywiki

    So I did begin work on a little tiddlywiki clone. But then fell back in love with Tiddlywiki when I was exploring the UI and code. I may have grabbed a tiddlyhost.com site 😆

    image.png


    I did customize it a bit. I'm using these plugins:

    and the theme, Krystal. The theme was a little broken for my version of Tiddlywiki so I added the following css and fix things up a bit.

    Other Dev Adjacent Things - File Management

    Another project I began tackling was my personal file management. Over the years I've tried various cloud services and some knowledge management systems. Which made everything a mess. So it's time to clean it all up before the new year. I was inspired by this post about Slaying the Obsidian Dragon and this one that is linked to about File System Infobase Manager and got started.

    I'm migrating everything to my main Linux computer and I'm using the following naming convention for my files: "key1-20231127-descriptive-file-name". The "key1" is both the category and subcategory that the file belongs in. For example I have a category "kids". "kids2" is all public school related information. "kids3" is all summer camp related information. So the public school calendar for my daughter was renamed to "kids2-20230906-school-year-calendar-23-24.pdf". The second part of the file name is the file creation date. Then I'm just plopping all the files in one big directory.

    I also have on master text file at the top that lists all the categories and subcategories. This is working really well for single files. I'm still figuring out how I want directories of files to be organized (or removed) and if I want to do something similar for my images/videos.

    Other Dev Adjacent Things - Learning Rust

    I made a little time at the end of the week to play around with Rust. I like it! I've done a few small examples in it and now I want to dig into it a bit more with a small project after I finish the Rust book. I think I'm going to combine it with my want to code my own web browser. So I spent time gathering up resources, checking out posts from other brave souls, and I'm ready to start thinking a bit more deeply on it.

    I also came across this interesting video while hunting, great food for thought: Hammock Driven Development - Rich Hickey

    I'm not interested in building the functionality around HTTP or parsing the DOM/CSS, so I'll probably just use premade libraries for that. I am interesting in (descending order of interest): Protecting the user (trackers, bad JS actors), making discovery easier/safer (it's a web after all, RSS?), helping the user keep track of things (bookmarks? tags?), user defined styles, math behind CSS box models. That's not to say this project will tackle all, or any, of those. I'm also not interested in just taking one of the standard browsers and trying to copy it. I want to make something a little different, even if I'm the only one who will use it 😁


    Okay, one day when I say my update is short... I'll mean it. I just kinda zone out when writing these updates and the next thing I know they are super long. 🤷‍♀️

    Anyway, until next week,
    Loura


     #code  #tags-lillihub  #Longform 
  • Dev Diary 007 - Week of November 13th

    Remember how I said, everything back to normal? That lasted all of Monday morning. Then I got the call from school that my daughter hurt her knee... getting a pencil. We are still running around trying to figure it out (Whew, thankfully it's not Lyme disease). Then my son messed up his orthodontics... We are still running around trying to get appointments to get it fixed. Then my neck seized up from the stress of it all. 

    So yeah, I got stuff done, this write up is gonna be short, I'm going to go do some Tai Chi to re-center.

    Work Work
    A major framework update needs to be applied to the codebase. Over 3000 changes, thankfully most auto-merged but I have about 230 to review manually. My life at work is a never-ending scroll of code commit diffs.

    Lillihub
    I released it! Yay! 🥳

    And it didn't crash into a million little pieces as people began to check it out. 🙌

    I really appreciate everyone who helped me beta test, gave me feedback, or left a nice comment. As I said, this week was tough and it helped lighten my mood on Friday seeing people enjoy it.

    Before I launched, I added tinylytics to the public landing page and the login page to get a since at how many people are checking it out and what device/browser they are using. Not everyone who visits the landing page is going to login, and you only need to login once every two weeks. The stats are public and you can check them out here: Lillihub | Stats page | tinylytics

    image.png


    Next we can take a look at the number of requests. Right now Lillihib is running on the free Deno Deploy plan and I took great care when writing the app to make as few requests as possible on the client to Deno Deploy (though I make plenty to the Micro.blog API). When I announced Lillihub on Friday it peaked at around 2.5K requests for the day. Now it's hovering around 1K per day.

    image.png


    Which is fantastic! Plus the error logs look pretty good. Only a handful of "Bad Requests" I need to hunt down.

    I also wrapped up a little more dev work as well. A little sneak peak before I update Lillihub later this week, you can now swipe photos on the desktop view 📷 😆

    image.png


    I decided to use a web component, https://shoelace.style/components/carousel, for the photo-swipe. I degrades gracefully for those without JavaScript, because JavaScript free is 100% supported by Lillihub. It simply defaults to what it always had... stacked photos. 

    Also included:
    • Post titles, when they exist, to the "My Blog" -> "Posts" area. 
    • Better date display (when JavaScript enabled) otherwise it defaults to the format Micro.blog returns
    • Tagmoji list on the "New Post" page. That way you don't have to guess what the tag emoji is...

    Personal Blog
    Thanks to my new-to-me, MacBook Pro from 2019, I was able to track down the issue with my Rainbow Road blog design and fix it. I'm a little bummed that it was because Safari and Firefox on iOS have issues with using image-rendering: pixelated; on border-image-slice. Which made me change how I structured the page to get the border to display nicely. I really wish browsers were more consistent.


    Okay, that's enough for now 😄
    Until next time,
    Loura 


     #tai chi  #code  #tags-lillihub  #Longform 
  • Dev Diary 006 - Week of November 6th

    This week was back to pretty much normal now that everyone is over their colds and now that my wisdom tooth is gone 😄

    General Development

    So far this year I've tried a handful of ways to track my tasks. Both physical copies inside of journals and on post-it-notes. A couple of apps too, like Notion or Zoho Notes. Still haven't found a system that sticks around for more than a few months. So on a whim I did some searching and came across:
     

    Which made me want to switch back to paper for now. Then my mind jumped over to difference to tracking my knowledge versus my tasks. I tend to mix the two together and then have my little nuggets of knowledge get mixed up with unfinished tasks or tasks, infused with knowledge, discarded when done. I find this most often occurs with my development work. Which circled me over to one of my familiar topics that I revisit every couple of years. Creating a personal wiki. And whenever I think wiki, I think TiddlyWiki.

    Turns out I'm not the only one who thought of maybe hosting one on Micro.blog

    I came across this video next. A little meandering but I really enjoyed it.

    Now that video brought up a term that I hadn't heard in a long time: Quine. A quine is a computer program which takes no input and produces a copy of its own source code as its only output. Which took me back to my first foray into learning about the indieweb and thinking I might like to start a blog. I built a little self-saving HTML engine back then. The code isn't the best, but it worked.

    I wonder if I could code my own little TiddlyWiki clone and make a little personal knowledge management system out of it. Hmmm 🤔

    Which meant I almost immediately started a little local project to see if I could get something simple up and running. I'm making use of:


    It's still rather undefined at this stage. I want it to be a quine like TiddlyWiki, because that seems like a fun concept. I want to use web components to get a bit more familiar with them. I want to be able to tag notes and support backlinks. I'll share more as I play around and build things out.

    Hexcrawls and Dungeon Crawl Classics

    I'm running the players through The Dark of Hot Springs Island, which is a hexcrawl. It's basically a play style where you have a map, a bunch of random tables, and then you piece together what happens while the players explore. This particular one has tons of tables, plus a dash of objectionable content I want to filter out. So I wanted to see what was out there to make this as easy as I could to run.

    I found this neat little program called Hexdescribe where you can describe the map and create a bunch of random tables to apply to the areas on the map. The syntax to build these out it pretty simple and powerful. The map I came up with is this:

    text font-family="monospace" font-size="1px"
    0103 ocean
    0104 ocean
    0106 ocean
    0107 ocean
    0202 ocean
    0203 dark-green village "HS-01"
    0204 ocean
    0205 ocean
    0206 dark-green trees "HS-14" 
    0207 ocean
    0302 ocean
    0303 dark-green trees "HS-02"
    0304 dark-green trees "HS-05"
    0305 dark-green forest-mountains "HS-09"
    0306 dark-soil mountains "HS-15"
    0307 dark-green keep "HS-19"
    0308 ocean
    0401 ocean
    0402 dark-green trees "HS-03"
    0403 dark-soil mountains "HS-06"
    0404 dark-green forest-mountains "HS-10"
    0405 dark-green forest-mountains "HS-16"
    0406 dark-green trees "HS-20" 
    0407 dark-green trees "HS-23"
    0408 ocean
    0501 ocean
    0502 dark-green village "HS-04"
    0503 dark-green trees "HS-07"
    0504 rock "HS-11"
    0505 dark-green forest-mountains "HS-17"
    0506 dark-green forest-mountains "HS-21"
    0507 dark-green trees "HS-24"
    0508 ocean
    0601 ocean
    0602 dark-green trees "HS-08"
    0603 dark-green forest-mountains "HS-12"
    0604 rock "HS-18"
    0605 dark-green forest-mountains "HS-22"
    0606 dark-green forest-mountains "HS-25"
    0607 ocean
    0702 ocean
    0703 dark-green trees "HS-13"
    0704 ocean
    0705 ocean
    0706 ocean
    0707 ocean
    0802 ocean
    0803 ocean
    include gnomeyland.txt

    Which displays the island the adventure takes place. Though I did need to tilt it to make the hexes line up.
    image.png


    The next thing I did was take the random encounter tables and hex descriptions and add them in. But that produces a lot of text. So I altered it to use global variables and display information for only one hex at a time. It does require me to go in an update the location of the players each time it runs, but I find it worth it to have a much more concise output. Here is a sample of what my output looks like:

    
    Water Imp: Init +6; Atk claws +5 melee (1d4) or water jet +10 missile fire (2d6); AC 16; HD 2d8; MV 40’ or swim 80’; Act 1d20; SP chill water (when submerged, may freeze 20’ diameter sphere of water to subzero temperatures), vulnerable to fire and heat, elemental traits; SV Fort +8, Ref +8, Will +8; AL N.
    
    • Init 18; HD 14; Dilute,Simmer,Wave
    • Init 7; HD 9; Pool,Globe,Spout

    Interesting Flora: Constrictor Vine: Roots that resemble pale hair grow outward from central bush for 30’ to 50’, then constrict back. Reshape and destroy areas. Edible berries.

    The Rusted Hydra (hs-16-01) Ancients A spire of basalt 30’ tall, 20’ in diameter, and covered in smooth vertical channels rises from an overgrown slope. A red-brown statue of a seven-headed hydra stands atop the spire, mouths agape in a frozen roar toward the sky. Rainbow-colored flowers bloom thickly around the outcrop.


    And a sample of the code that produced that:

    ;Explore Hex
    1,
    Weather: [[same type] [same currentWeather]]
    Wandering Encounter[[same type] Wandering Encounter]
    Interesting Flora: [Interesting Flora]

    ;hs-16-01 explore description 1,[global store Mountainous-Jungle as type][Explore Hex][hs-16-01 explore]

    ;hs-16-01 explore 1,The Rusted Hydra (hs-16-01) [The Rusted Hydra]

    ;hs-16-01 investigate description 1,[global store Mountainous-Jungle as type][Explore Hex][hs-16-01 investigate]

    ;hs-16-01 investigate 1,The Rusted Hydra (The Dark) (hs-16-01) [The Rusted Hydra]

    The Dark

    [The Rusted Hydra The Dark]

    ;The Rusted Hydra 1,

    Ancients

    A spire of basalt 30’ tall, 20’ in diameter, and covered in smooth vertical channels rises from an overgrown slope. A red-brown statue of a seven-headed hydra stands atop the spire, mouths agape in a frozen roar toward the sky. Rainbow-colored flowers bloom thickly around the outcrop.


    Getting all the info from the adventure pdf into the right format was a lot of copy-and-paste. But using hexdescribe made it super quick to start running the game when I was finished and it gave me all the pieces I needed to start crafting the story for the players. 

    Another thing I added for fun, the tables for weather. I used the concept of a hex weather flower and now I can enter in the weather they just encountered and get what the weather will be. Here it the input I used for the weather portion. I hope to extend it with actual randomized descriptions of the weather at some point.

    Anyway, that was a lot to jot down. It’s time for some tea and to find a good book to read. 🍵📚

    Until next week,
    Loura

     #code  #Fun & Games  #Longform 
  • Dev Diary 0005 - Week of October 30th

    Job Related

    This week ended up being a short week as well so I didn't quite get through my to-do list as I planned. But I still managed to straighten out the application permissions and role creation (which groups common permissions together). I wrote several more unit tests and started mapping out a QA test plan. My boss said one of the help desk employees will help out testing application so I want to make sure that testing is approachable and that we have a good way to track issues in Asana (the project management system my company uses).

    General

    Sick kids, sick husband, sick me. Though I avoided the head cold that was going through the rest of my family my wisdom tooth infection was pretty bad. So I got it removed on Thursday. Ouch.

    Side Project - Lillihub

    Besides playing Animal Crossing, I worked on my side project and updated it with a couple new things and all the changes I wrote about from last week

    The biggest one I think people will like is side swiping images (when there are multiple) on small screens. I tried getting it to look good and work well on a large screen, but horizontal scrolling is just a difficult UI monster at that size without resorting to JavaScript. So I played it safe and only did the swipe on small screens. I'll continue to ponder how to make it work desktop users. 

    In general, on the server using a DOM parser I check each post for multiple images. If I find multiple images I save a reference to that image (or the anchor element if the image is in an anchor tag) and then remove it from the DOM. Then I create a new div container with the css markup I need and append it to the bottom of the post, placing each image inside.

    It isn't 100% perfect, if the underlying blog post had malformed HTML tags, or really small images... things can look a bit strange. But overall it works as I expected.

    I did get rather frustrated trying to implement "last seen" functionality. I kept running into issues setting a cookie with a post id. I'm not sure if it's because I was doing it inside a GET request or if it's because I'm using chunked transfer encoding or something else. I'll need to dig into this. 

    Here are the other things I did:

    • The post editor now has spellcheck enabled
    • The post editor now has a character counter
    • Made UI consistent across bookmarks, bookshelves, manage blog area with same action button format as the posts
    • Manage blog posts now shows the full text of the blog post for long posts as well as short posts
    • The permalink for the post is now above the comments
    • Added in a favico.ico
    • You can now unmute and unblock users (from their profile page, under Advanced)

    Also, lots of little bug fixes everywhere. Some from when I refactored and some that were there all along.

    I also released the source code! Yay! 

    I'm not sure why showing people my code, outside of work, bothers me. Imposter syndrome? Spending too long as a solo developer and developing bad coding habits? Maybe.🤷‍♀️ But in any case. It's up there for people to take a look 😄

    Until next week,
    Loura
     #code  #tags-lillihub  #Fun & Games  #Longform 
  • Dev Diary 0004 - Week of October 23rd

    Job Related

    Vacation week 🥳

    General

    I had high hopes for a productive vacation. I wanted to repaint my home office and decorate it. I wanted to get journaling done, go on walks, do some shopping, and work on my side projects... Life decided I needed an infected wisdom tooth that I now need to get removed. Which prompted some high anxiety moments. Add in two sick children and I didn't really get much accomplished.

    Side Project - Lillihub

    I did get some progress done on Lillihub. I've gone through and put in documentation, refactored and simplified where it makes sense and got it running locally. I've been using the Deno Playground Editor up until this point. I just need to flesh out the README.md and then I'll send out the update to my beta testers.

    I did adjust the menu/action button area for posts. I liked having it above the comments but I could only fit at most four actions before it didn't work for smaller screen sizes. I could go with icons... and that does seem like the UI trend everywhere. But I like buttons spelled out for me. That way I don't need to guess what action is associated with the button.

    image.png


    I also added in a "Photos" page when viewing the profile of a user. It makes a nice little grid and then you can click the image to go to the post itself.

    image.png


    A couple other things I squeezed in:
    • Blockquote styling
    • All posts have a "Quote" button which takes you to the editor with the post text already in a blockquote
    • All posts now have a "View Post" link that takes you to the single post view in Lillihub - which has the comments auto expanded
    • Fixed the bug on managing bookmark tags
    • Reduced the image size requested from the micro.blog CDN in an effort to make pages more friendly to those with poor network quality.
    • Added an indicator next to a username if you are not following them. The action toggle also has a "Follow User" button in this case.
    • Added link to user website on profile page.
    • Fixed bug when uploading an image without JS turned on. It wouldn't redirect back to the page.

    Things I'm thinking about
    • Making image quality a setting. That way people who want large images coming over the network can.
    • I still want to make multiple image posts side-scroll on small screens. It's challenging since there is no fixed format multiple images come over. Could be a sequence of image tags, or images in separate paragraphs or something else....
    • Make the editing experience a bit better.
    • Add in a "last seen" divider on the timeline & conversations page, so you can know where you last left off
    • Add in a "new post" indicator (for those with JS) if there are new posts to see
    • A couple of issues: iframe issue in iOS action bar, autocorrect in markdown editor, word count in editor, and mention page crashing sometimes.

    Things I Learned

    How to make the details tag in css look kinda-like a modern dropdown button. You need to make the position absolute and then set the margins based on where you want them on the page. Since I had the details tag on the right side of the page I gave everything negative margins to pull it left. Set the z-index so it opens above the content on the page.

    details {
       position: absolute;    
       z-index: 5;    
       margin-left: -92px;
    }
    .details-content {
      margin-left: -129px;
      width: 200px;
    }

    And the HTML element

    <details>
      <summary>Actions</summary>
      <div class="details-content">
        <button>Hello World</button>
      </div>
    </details>

     #code  #tags-lillihub  #Longform 
  • Dev Diary 0003 - Week of October 16th

    This week was all about adjusting the application to handle a special user role. In general the application is your standard multi-tenant application except we have one type of user that needs to operate across tenants but isn’t a super user. They are restricted to a subset of tenants (unlike a super user) but also have elevated permissions across those tenants. So I had to scaffold up some tables to manage the user to tenant links and now I’m adjusting the back-end services to respect the permissions. I also created a handful of tests to check various permission cases. I’m on vacation next week but when I return I’ll start the changes needed on the front end.

    Side Project - Lillihub

    I’ve started cleaning up the code and adding in documentation. Right now the project is a single1 JavaScript file under 2500 lines (and under 128KB2). That includes the everything. The HTML, CSS, a touch of frontend JS and all the backend JS for the webserver running on Deno. There is no build step and there are no frameworks. And I really want to keep it that way. The problem is that adding in documentation is taking up precious bytes. So I’m refactoring and keeping things DRY in an effort to keep things slim.

    Why? I’m an odd duck developer. Maybe its because I’ve worked solo all my career but in order to push myself and become better I tend to place constraints on myself. It forces me to grow and look at problems from different angles. I don’t do this at work but my side projects are all fair game to my crazy ideas.

    I didn’t want Lillihub to be a chore to maintain. Which inevitably happens when you add a metric ton of dependencies. I wanted Lillihub to not only work without JavaScript… but be a delight to use without JavaScript. Hint to anyone out there who wants to do that: Turn off JavaScript on your browser when you are developing. It’ll make the pain points pretty obvious.

    I’m still aiming to release the app for Micro.blog users and make the source code public in November 🫣 which is a little nerve wracking.

    Side Project - Blog Redesign

    As I mentioned last week. The clean simple design I created was getting on my nerves. So…. what to do…. Apparently make a delightful little theme inspired by Super MarioKart. I spent many delightful hours in my youth perfecting my runs through Rainbow Road for the sole purpose of beating my siblings. I spent an hour making the delightful border along my blog content. Worth it.

    What I learned

    The powers of border-image-slice in CSS in conjunction with image-rendering: pixelated;. It really helps make retro feeling borders.

    What I’m thinking

    That streaming HTML is super cool. Why haven’t I known about it before.

    Why am I getting broken pipe and Http - response already completed errors from Lillihub? My search-engine-fu is failing me here.

    PostScript

    1 : Okay you caught me. I am using two external JS files on the front end. One is a markdown editor and one is an image compressor library.

    2 : The KB restriction is from the Deno Playground. One file and a max of 128KB. I wasn’t kidding when I said I wanted to keep things small and the Deno Playground Editor is such a delight to use that I’m willing to play by those constraints 😆.

     #code  #tags-lillihub  #Longform 
  • Dev Diary 0002 - Week of October 9th

    Now the MVP is done at work, it is time to show it off. We had a wonderful team lunch and I was able to walk the staff and the director through everything I’ve been building this last year. It was well received and everyone seemed excited for the next set of features I’m building out. We decided that there will be two more build out phases in the project. Focused on getting user feedback and making any adjustments needed. After that it will be pushed to production and replace the current system. I still have a hard time wrapping my head about the timeframe needed to get everything completed. But I’m hoping that this time next year the rewrite will be up and running and I’ll no longer need to support the legacy application

    Side Project - Lillihub

    Lillihub got an update at the end of this week! This will probably be the last big update before I open up the app to anyone who wants to try it out. I need to focus the next two weeks on getting some screenshots, writing up some documentation, and cleaning up the code. Here’s what I was able to add this week:

    Content Filters

    I added in the ability to set content filters. There have been a couple times when a person I follow on Micro.blog posts something that isn’t that great for my mental health. I don’t want to stop following them, I just want that topic hidden. So that’s essentially what this does.

    I save a cookie with a comma separated list of terms and then I check both posts and replies for that term. If it appears, I remove the whole thing. The following code snippet returns true if any terms in the contentFilters array are contained within the text of content_html

    contentFilters.some(filter => filter.toLowerCase().trim() != '' && content_html.toLowerCase().includes(filter.toLowerCase().trim()));`

    Right now I do have a placeholder when content is removed but depending on user feedback I might remove this.

    screenshot of lillihub showing the UI when a post is filtered out

    Bookmarks

    At first I thought I couldn’t add bookmarks using the Micro.blog Bookmarks API. But digging into it a bit closer I realized that the indieweb microformats did have the concept of a bookmark. At first I tried just making posts with the correct classes on the posts, like u-bookmark-of but that didn’t work. The Micropub spec I was using doesn’t mention bookmarks but eventually my searching online brought up the bookmark documentation from indieweb.orgthat specified how to make a bookmark post against a micropub implementation. And it worked! So now Lillihub can add a url as one of your bookmarks in Micro.blog.

    I also added in the ability to create a post from one of your bookmarks. Right now it just takes you to the create a post page with the bookmark in a blockquote but this is something I hope to improve upon in a later iteration.

    Crossposting (per post)

    This was requested from one of my beta testers and seeing as @manton updated Micro.blog with the ability as described in his post Adding per-post cross-posting to Micro.blog I thought I would add it as well. This was a bit of a pain since I don’t use cross-posting and in order to test it I needed to set up both new accounts on different services and set them up on Micro.blog. But I managed it and with a little bit of trial and error I got things working. In general you:

    1. Make a get request to https://micro.blog/micropub?q=syndicate-to to get the targets a user has configured.
    2. When posting to the micropub endpoint, add a query parameter of mp-syndicate-to[] for each target.

    Side Project - Blog Redesign

    Okay, I dislike the new design I have. Simple and elegant is just not how my blog rolls. I’m already working on something new to put in its place this upcoming week. I also purchased a year subscription at tinylytics since I’m pretty interested in some stats on people who visit the lillihub landing page I’m going to put on my blog.

     #code  #tags-lillihub  #Longform 
  • Dev Diary 0001 - Week of October 2nd

    I came across this blog post as I was working this week. Claire Codes - Dev Diary and it inspired me to try my hand at one. I’ve seen some other people write a weekly note and I think it’s in a similar vein. Just a little more focused on my software development skill set and not life in general. I can’t promise I’ll do these every week. But it is something I’ll aspire to.

    Our last contractor for this work project had their contract end on the last day of September. Because of the time difference in our working schedules their final pull request didn’t come in until after I signed off for the evening. So first thing Monday was reviewing it, making sure the tests all passed and getting it in the Azure pipeline to go up to our test instance.

    This marked the end of any outside help due to a lack of grant funds, the end of the MVP phase, and me taking the project the rest of the way solo.

    I spent most of the week going through the MVP with a fine tooth comb and coming up the next list of high priority features and gathering requirements. This dev cycle should take me until the end of March 2024 if my estimates are close.

    Side Project - Lillihub

    My side project, Lillihub, is going well. I have around 25 beta testers at the moment providing fantastic feedback. And based on the number of requests over the week people are actually using it. I’m hoping this will help me gauge request #’s when I release it outside the beta test.

    two line graphs of the activity of lillihub from the last 24 hours

    I did one small update this week. There was a bug where if the timeline feed had a video embed, it would stop loading any more posts. This has been resolved. I also got some feedback on the design portion and did a little css update to smooth a few things out for now. It should be a little less boxy and has a subtle gradient as you scroll. Personally, I love how the dark mode is coming along.

    Which brings me to…

    Side Project - Blog Redesign

    I need a place to put some Lillihub documentation and help articles. I go back and forth on getting the project it’s own separate website. For now I think I’ll have it as a subsection of my website since I don’t see this moving beyond a hobby project and that gives me another reason to redesign my blog. I think this is change number four in under a year 😆

    It’ll still be a micro.blog hosted blog under the hood. I’m aiming for something pretty simple with one large illustration on the side. I’m having fun learning a bit of Hugo and customizing how bookmarks can be nested.

    What I Learned

    How to generate a number between 1…n in Hugo

    So I bought some lovely hand drawn svg illustrations to go on my website from TwigandMothStudio - Etsy and I wanted a random one on each page of my website. I have a total of 18 illustrations that I named 1.svg, 2.svg, … and so on. Now in Hugo you can use {{index (seq 18 | shuffle) 0}}.

    • What this is doing is basically making a sequence, list, of numbers from 1-18 with seq 18
    • Mixing up the list by shuffling the elements with shuffle
    • Then grabbing the first element by it’s index of zero index (seq 18 | shuffle) 0

    How to change the fill color on an external SVG

    The SVG file’s I purchased have a fill color of black and I wanted them to match the colors I’m using. Which I found out you can do with a css filter! Here is what I’m using for the light theme:

    filter: invert(30%) sepia(13%) saturate(983%) hue-rotate(196deg) brightness(94%) contrast(90%);

    Now figuring out what values are needed for the filter can be a chore. But someone already build a little tool for that. CSS filter generator to convert from black to target hex color It’s fantastic!

    How to create a custom single page in Micro.blog theme

    I want to split my website into two main areas. One that has my general website and blog related items and one that can be customized as a product page for Lillihub. Luckily a Micro.blog custom theme can let you do just that.

    It boils down to creating a layout template page and a content page. The content page creates that page on the website and then you tell it what custom layout you want to use using frontmatter. You’ll need a title and a type. The type needs to match the layout name you want to use. So for instance, I did content/bookmarks.md with a type: bookmarks in the frontmatter.

    I also created a file layouts/bookmarks/single.html which held the template. Even though the template is a single you can still access lists of categories and other items Micro.blog makes available in templates.

    How to nest bookmarks under tags in Micro.blog

    I love the fact that Micro.blog premium let’s you have bookmark tags. So I wanted to update my theme to take better advantage of it and nest the bookmarks under the tag name. The code is a bit long to just paste here, so you can find it in my micro-blog-nested-bookmark-tags (paste.lol). In general this is what’s needed:

    • Make an empty collection called $tags
    • Iterate through the tags and add them to the collection. Since they are comma separated, you’ll need to split them on the comma first.
    • Remove any duplicates from $tags
    • Iterate through $tags and select bookmarks that have the current $tag. I also chose to ignore the empty tag.
    • Display the items.
     #code  #tags-lillihub  #Longform 
  • Coding a framed productivity app - building out the calendar

    Coding a framed productivity app - building out the calendar

    This is a continuation of my experiments using iframes as a modular way to build an app. You can start from the beginning here: Introduction Post.

    This is what I’ll be building today: code, preview
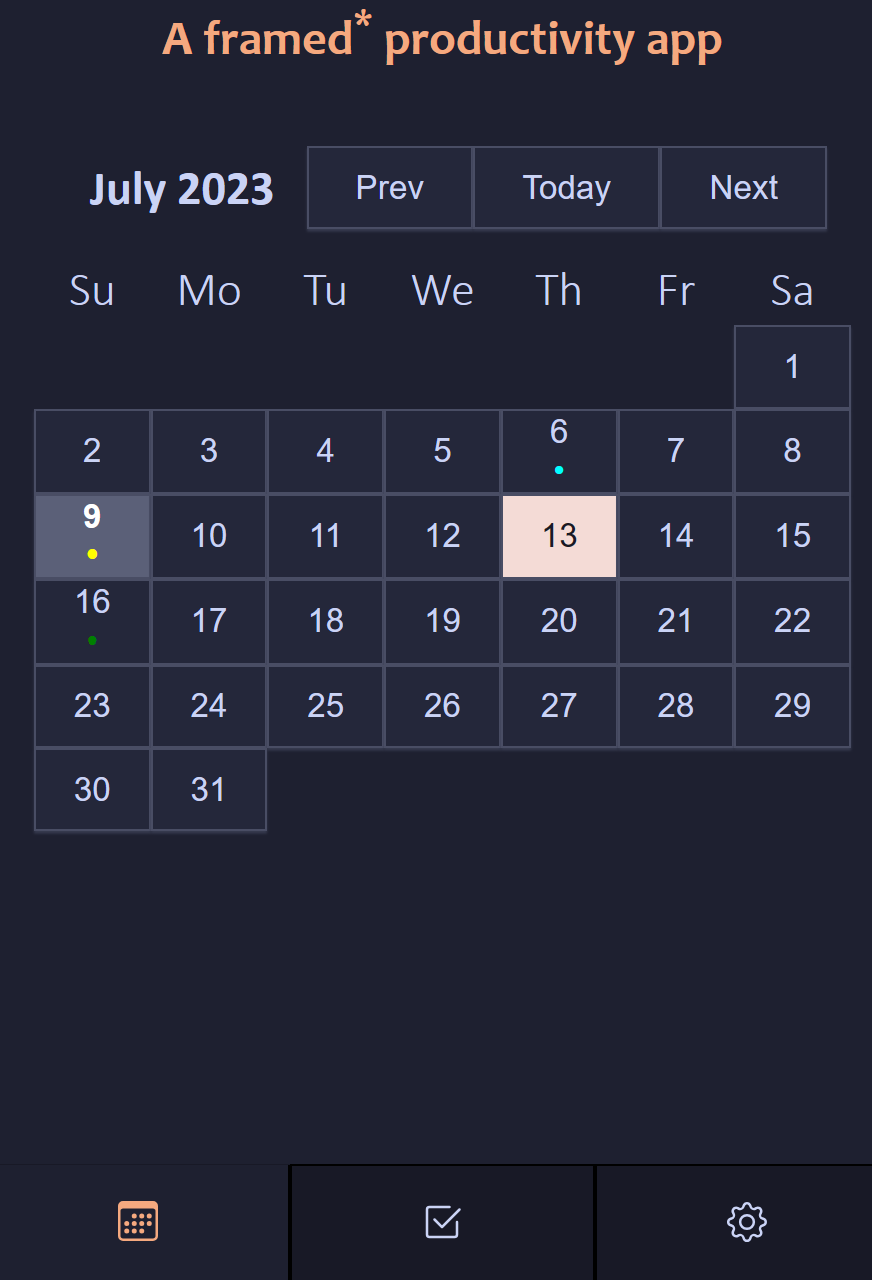
    screenshot of a calendar app with dark buttons and a few dots on the dates in different colors

    This calendar will form the starting point of my productivity app. Now this app begins to toe the line of, why don’t you just use web components or one of the many many framework libraries? And if I were building something for my company or working with other developers… I would.

    But I’m fond of this idea. And honestly, playing around with this approach, I like more and more. It keeps things modular without the overhead of a large JavaScript framework and doesn’t require any server-side processing. There is a nice simplicity to writing HTML includes this way.

    Getting Started.

    Want to follow along? You are going to need some basic familiarity with JavaScript, html, css, you will need a code editor and have the files served from a webserver. Due to iframe restrictions, this won’t work locally.

    So in my last post A basic framed* website… more experiments with disappearing iframes I showed a way to pull an iframe into a page and run any script tags that it contained. Some might have noticed that with anything complicated you’d probably run into scope issues. For instance, id tags might clash. A call to document.querySelector might return an unexpected element when it is run from the parent (because another element might be a match). So if I’m going to be serious using this, that’s going to need to be fixed.

    Also, just some clean up. Script files are now in the script folder and styles are in the… you guessed it… styles folder. I put all the fragment pieces (or should I call them components… arg… naming things is hard) in a fragments folder. The colors I chose for the app come from catppuccin/catppuccin: 😸 Soothing pastel theme for the high-spirited! (github.com), the font stack is “Humanist” from Modern Font Stacks and the icons are from Bootstrap Icons · Official open source SVG icon library for Bootstrap (getbootstrap.com).

    I rolled my own css taking advantage of css grids and flex-box. The main css file is only 65 lines long. Not too shabby. And the css in the ./fragments/_calendar.html is an additional 20. Considering most website calendars are monsters of JavaScript and lots and lots of divs I’m quite happy.

    The calendar I’m building is for letting the user navigate around and it boils down to a bunch of buttons and a couple of classes. The data-day attribute helps keep the JavaScript clean and tidy so I don’t need to look at the button text to determine what day the button represents.

    
    <!DOCTYPE html>
    <html lang="en"><head>
      <meta charset="utf-8">
      <meta name="viewport" content="width=device-width, initial-scale=1">
      <meta name="robots" content="noindex, nofollow" />
      <script src="/scripts/fragment.js" type="text/javascript"></script>
    </head>
    <body>
      <section>
          <div class="month_picker">
            <b>
              <span class="date_month"></span>
              <span class="date_year"></span>
            </b>
            <button class="previous_month" type="button">Prev</button>
            <button class="today_switch" type="button">Today</button>
            <button class="next_month" type="button">Next</button>
          </div>
          <div class="weekday">
            <div>Su</div>
            <div>Mo</div>
            <div>Tu</div>
            <div>We</div>
            <div>Th</div>
            <div>Fr</div>
            <div>Sa</div>  
          </div>
          <div class="day_picker">
            <button data-day="1" type="button">1</button>
            <button data-day="2" type="button">2</button>
            <button data-day="3" type="button">3</button>
            <button data-day="4" type="button">4</button>
            <button data-day="5" type="button">5</button>
            <button data-day="6" type="button">6</button>
            <button data-day="7" type="button">7</button>  
            <button data-day="8" type="button">8</button>
            <button data-day="9" type="button">9</button>
            <button data-day="10" type="button">10</button>
            <button data-day="11" type="button">11</button>
            <button data-day="12" type="button">12</button>
            <button data-day="13" type="button">13</button>
            <button data-day="14" type="button">14</button>
            <button data-day="15" type="button">15</button>
            <button data-day="16" type="button">16</button>
            <button data-day="17" type="button">17</button>  
            <button data-day="18" type="button">18</button>
            <button data-day="19" type="button">19</button>
            <button data-day="20" type="button">20</button>
            <button data-day="21" type="button">21</button>
            <button data-day="22" type="button">22</button>
            <button data-day="23" type="button">23</button>
            <button data-day="24" type="button">24</button>
            <button data-day="25" type="button">25</button>
            <button data-day="26" type="button">26</button>
            <button data-day="27" type="button">27</button>  
            <button data-day="28" type="button">28</button>
            <button data-day="29" type="button">29</button>
            <button data-day="30" type="button">30</button>
            <button data-day="31" type="button">31</button>
          </div>
      </section>
    </body>
    </html>
    

    The real workhorse here is the css. display: grid; is where the magic happens.

    
          .weekday, .day_picker {
            display: grid;
            grid-template-columns: repeat(7, 1fr);
            text-align: center;
          }
          .month_picker {
            text-align: center;
            display: flex;
            align-items: center;
            width: 100%;
            padding: 0.5em;
          }
          .month_picker > * {
            flex: 1 1 auto;
            text-decoration: none;
          }
          .day_picker button.hide-date {
            display:none;
          }
    

    We have a couple of things JavaScript will take care of, showing the name of the month and the year. Highlighting today and what’s been selected (via classes) and most importantly hiding any extra days in a month and shifting over the day of the week the grid starts on (hint, css does this).

    Planning out the interactions

    1. When a user clicks the Next of Prev buttons the month shown should change accordingly
    2. When a user clicks the Today button, the calendar should show the current month with today’s date selected.
    3. When a user clicks on a date button, that date should be selected.

    In all cases, the fragment should notify the parent about the interaction either that the date changed or the month did. It’s the parents' responsibility about what should happen because of that interaction. Perhaps it saves the information somewhere, perhaps it will notify a different fragment.

    Restricting scope

    One thing that I need to fix is how to target just the element I’m interested in for these click events and nothing else. Which means I need to lock down the scope somehow. I’m envisioning a way to label an iframe, so that inside it I can use that as a selector and keep my JavaScript from being over eager. That sounds an awful lot like an id attribute. Note: There is also an loading="lazy" on the iframe which helps with performance.

    
    <!DOCTYPE html>
    <html lang="en"><head>
      <meta charset="utf-8">
      <meta name="viewport" content="width=device-width, initial-scale=1">
      <meta name="description" content="a basic calendar and todo list app">
      <title>Framed* Productivity App</title>
      <script src="scripts/disappearingFrame.js" type="text/javascript"></script>
      <link rel="stylesheet" href="./styles/style.css" /> 
    </head>
    <body>
      <iframe aria-busy="true" 
          src="./fragments/_header.html" 
          loading="lazy"
          onload="disappear(this)"></iframe>
      <main>
        <iframe aria-busy="true"
          id="main_calendar"
          src="./fragments/_calendar.html" 
          loading="lazy"
          onload="disappear(this)"></iframe>
      </main>
      <footer aria-live="polite">
        <iframe aria-busy="true" 
          src="./fragments/_nav.html" 
          loading="lazy"
          onload="disappear(this)"></iframe>
      </footer>
    </body>
    </html>
    

    Here is the index.html. You can see the id="main_calendar" on the middle iframe. Let’s write some code to grab it from inside. The ./fragments/_header.html and ./fragments/_nav.html are trivial so I won’t include the code here. If you’re interested they are up on glitch code.

    There is a way to get the id element of the frame using window.frameElement. You can actually get access to all the attributes that way. I’m going to alter the scripts/fragment.js file a bit here. One, I’m going to make the IIFE asynchronous. Second, I’m going to add an event listener to see when everything is loaded. Then I’m going to get either the id of the frame or generate a random identifier. Lastly I’ll set it on every child of the iframe body with an attribute name of scope.

    Why not use the id? Because someone might put an id on an element and I don’t want to override that and they might have multiple children, thus we’d be giving id’s to multiple elements which is a basic no-no.

    scripts/fragment.js

    
    ;(async () => {
      // if we loaded this outside an iframe... bail.
      if(window.self === window.top) {
        window.location.replace("/");
      }
    })();
    
    // when everything is loaded
    // set up an identifier so we have something to scope off of.
    window.addEventListener("DOMContentLoaded", (event) => {
    	let body = document.querySelector('body');
    	let uuid = window.frameElement.getAttribute('id') ?? self.crypto.randomUUID();
    	
    	for (let child of body.children) { 
    	  child.setAttribute('data-scope', uuid);  
    	}
    });
    

    and some changes to the disappear function in scripts/disappearingFrame.js to make sure our new script tag also has the data-scope attribute

    
    /* Copy the contents of the iframe into the DOM and execute scripts  */
    function disappear(frame) {
      let body = (frame.contentDocument.body||frame.contentDocument);
      let children = [...body.children];
      let scope = body.children[0].getAttribute('data-scope');
      
      for(let child of children) {
        if(child.tagName === 'SCRIPT'){
          let script = document.createElement("script");
          
          script.setAttribute('data-scope', scope);     
          script.text = child.innerHTML;
          document.head.appendChild( script ).parentNode.removeChild( script );
        } else {
          frame.before(child);
        }
      }
      
      frame.remove();
    }
    

    When the iframe “disappears” I won’t have access to the window.frameElement. By copying this data-scope attribute to every child I’ll have something to select off of. One other tweak. This works best if there is only one child with the data-scope attribute. Otherwise if the fragment body has multiple children you’d need to start looping to cover all the elements. So I made the design decision that I would structure my fragment like so:

    
    <!DOCTYPE html>
    <html lang="en"><head>
      <meta charset="utf-8">
      <meta name="viewport" content="width=device-width, initial-scale=1">
      <meta name="robots" content="noindex, nofollow" />
      <script src="/scripts/fragment.js" type="text/javascript"></script>
    </head>
    <body>
      <style>
    	... my styles here
      </style>
      <section>
    	... my elements here
      </section>
      <script>
        // * * * * *
        // inside the iframe you can access attributes on the iframe element
        // via the `window.frameElement`. Outside the iframe the attributes have
        // been copied to the script tag `document.currentScript`
        // * * * * *
        ;(async () => {
          <!-- Executes only when copied into the parent DOM -->
          if(window.top == window.self) { 
            const scope = document.currentScript.getAttribute('scope');
            const fragment = document.querySelector(`section[scope='${scope}']`);
         
          } // parent DOM code       
        })(); // end IIFE
      </script>
    </body>
    </html>
    

    The important thing is that it is one element that all the other DOM elements go within. Also, notice how the scope is grabbed. The script itself get’s tagged with the scope so you can grab it using document.currentScript.getAttribute('scope'). Then to be extra tricky I created a constant I called fragment that was set to document.querySelector('section[scope='${scope}']');. So now we can use fragment.querySelector in our code and only get elements from this instance of the fragment. Fantastic!

    The rest of the JavaScript code is a bit long for this post, so I’ll only call out a few items. But if you want me to go into more detail on the calendar functionality let me know below.

    Set events on the fragment, not the document

    
    fragment.addEventListener("click", (event) => {
    	...
    }); // end click event handlers
    

    Dispatch events on the document with the scope

    If you dispatch events with the scope…

    
    document.dispatchEvent(new CustomEvent('calendar-date-selected', {
      detail: {
    	date: event.target.getAttribute("data-date"),
    	scope: scope
      } 
    }));
    

    The parent can listen for it and react…

    
    document.addEventListener('calendar-date-selected', function (event) {
    	console.log(event.detail.date, event.detail.scope);
    	// do something cool
    });
    

    Set custom event listeners with scope.

    If you create the event listener with the scope you can make sure the right fragment (in the case of multiples) gets the right event. I’m using this to put the dots on the calendar.

    /fragments/_calendar.html

    
    // listen for custom event to render the dots on the calendar
    document.addEventListener(`calendar-render-dots-${scope}`, function (event) {
      // reset the buttons
      let dayBtns = fragment.querySelectorAll('.day_picker button');
      for (let btn of dayBtns) { 
    	btn.innerHTML = `${btn.getAttribute("data-day")}
    `; } // add in the dots for(let detail of event.detail) { var date = new Date(parseInt(detail.date)); let btn = fragment.querySelector(`[data-day='${date.getDate()}']`); if(btn.getAttribute("data-date") == detail.date) { btn.innerHTML += ` `; } } });

    index.html

    
    <script>    
      /* 
      **  calendar events 
      */
      document.addEventListener('calendar-date-selected', function (event) {
    	console.log('calendar-date-selected', event.detail.date, event.detail.scope);
      });
      document.addEventListener('calendar-ready', renderDots);
      document.addEventListener('calendar-month-changed', renderDots);
    
      function renderDots(event) {
    	if(event.detail.scope == "main_calendar"){
    	 document.dispatchEvent(new CustomEvent(`calendar-render-dots-${ event.detail.scope }`, {
    		detail: [{date: 1688875200000, color: 'yellow' },
    				 {date: 1689480000000, color: 'green'},
    				 {date: 1688616000000, color: 'aqua'}] 
    	  })); 
    	}
      }
    </script>
    

    But what about the scoping the CSS?

    It’s not perfect but we can get most of the way there. A good rule of thumb is to only have essential styles in the fragment. No need to make the buttons fancy, the parent can handle that. Once again we are going to lean on the disappear function to help us out.

    I’ll add a check for a style tag. We can get a list of all the styles by leaning on the browser. We can create a temporary document and a copy of the style tag. By appending to this temporary document, the browser will parse it. Then we can use the sheet.cssRules that lists all the style elements. Basically I loop through and split the selector on a , and then for each selector prepend [data-scope]=scope. Once I have all the changes, I replace the contents of the style tag with my changes and then append it.

    
    /* Copy the contents of the iframe into the DOM and execute scripts  */
    function disappear(frame) {
      let body = (frame.contentDocument.body||frame.contentDocument);
      let children = [...body.children];
      let scope = body.children[0].getAttribute('data-scope');
      
      for(let child of children) {
        if(child.tagName === 'SCRIPT'){
          let script = document.createElement("script");
          
          script.setAttribute('data-scope', scope);     
          script.text = child.innerHTML;
          document.head.appendChild( script ).parentNode.removeChild( script );
        } 
        if(child.tagName === 'STYLE'){
          let doc = document.implementation.createHTMLDocument("");
          let styleElement = document.createElement("style");
          styleElement.textContent = child.innerHTML;
          doc.body.appendChild(styleElement); // to compute the css rules
          child.innerHTML = '';
          
          // scope out the styles
          for(var style of styleElement.sheet.cssRules) {
            let selectors = style.selectorText;
            let scoped = [];
            
            for(var selector of selectors.split(',')){
              scoped.push(`[data-scope='${scope}'] ${selector}`);
            }
            
            child.innerHTML += style.cssText.replace(selectors, scoped.join(', ')) + ' ';
          }
    
          frame.before(child);
        }
        else {
          frame.before(child);
        }
      }
      
      frame.remove();
    }
    

    This method is not perfect but covers most of the css selector scenarios. Not bad for about 16 lines.
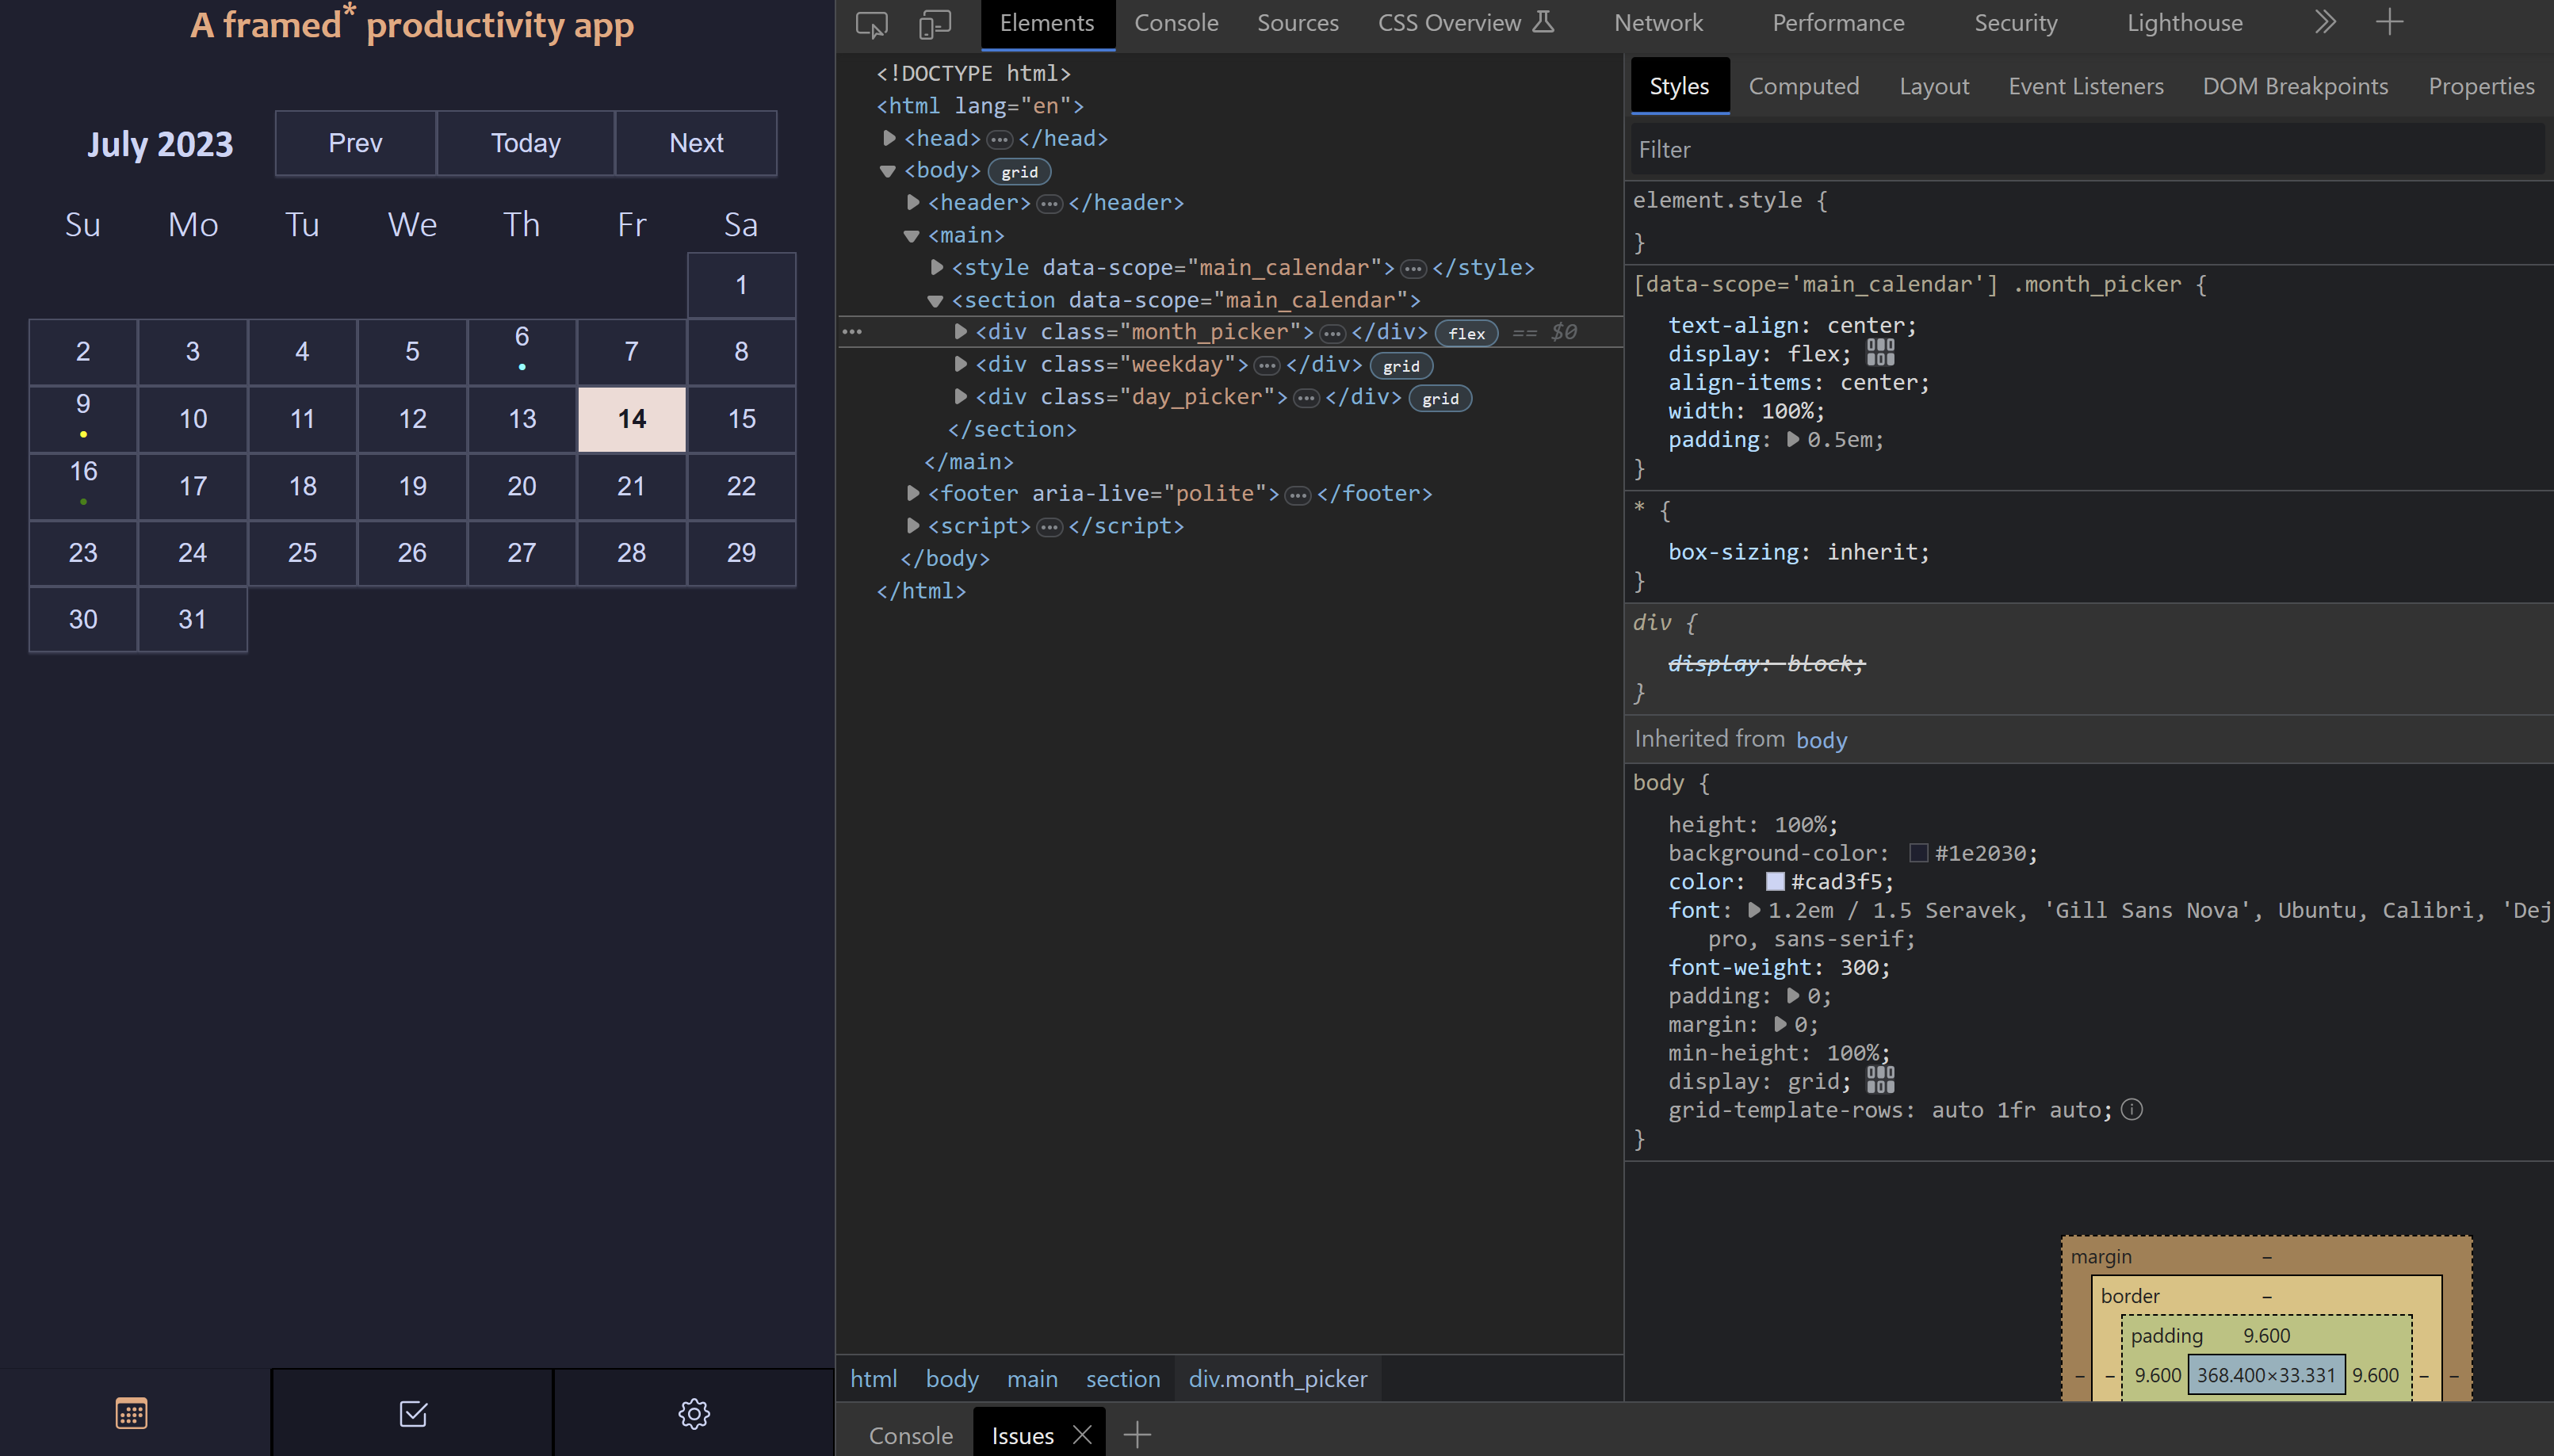
    screenshot of the UI with a code behind view highlighting the css class selector changes

    TL;DR

    The disappearing trick has graduated and now has a way to add scope to both the JavaScript and CSS contained within fragments. So we can use multiple of the same fragments on the same page. Also, with custom events we can interact with the parent page.

    The best part is, with two small script files and the html file anyone can take the calendar I built and add it to their website. code, preview

    Next Steps

    The next step is to add an event list to our calendar. This will demonstrate how two fragments can be used together for more complex interactions. But first, I’m going on vacation So stay tuned for the next post in two weeks.

    1. Let’s code something experimental… an introduction
    2. An experimental take on the retro website frames… disappearing iframes with vanilla-js, html, and css
    3. A basic framed* website… more experiments with disappearing iframes
    4. Coding a framed productivity app - building out the calendar (you are here)
    5. Coding a framed productivity app - building an event list (upcoming)
     #code  #Longform 
  • A basic framed* website... more experiments with disappearing iframes

    A basic framed* website… more experiments with disappearing iframes

    Want to follow along? You are going to need some basic familiarity with JavaScript, html, css, you will need a code editor and have the files served from a webserver. Due to iframe restrictions, this won’t work locally.

    From my An experimental take on the retro website frames… disappearing iframes with vanilla-js, html, and css post we know have a way of using html pages as page fragments using iframes and then making those iframes disappear. Let’s tackle a small proof of concept website using this method. We want the website to have the navigation links and footer to load in from iframes.

    So let’s start with a navigation fragment. Since my website is using the small classless css library Simple.css we’re going to structure the main navigation like they intended. Which is basically a nav tag in a header tag. Simple enough. Let’s create _nav.html and use our starting fragment template. Don’t know what’s needed in the fragmentRedirect.js file? Check out the previous post or code.

    <!DOCTYPE html>
    <html lang="en">
    <head>
      <meta charset="utf-8">
      <meta name="viewport" content="width=device-width, initial-scale=1">
      <meta name="robots" content="noindex, nofollow" />
      <script src="fragmentRedirect.js" type="text/javascript"></script>
    </head>
    <body>
    
    </body>
    </html>
    

    Next we’re going to add in the navigation and the links to the pages of the website.

    <!DOCTYPE html>
    <html lang="en">
    <head>
      <meta charset="utf-8">
      <meta name="viewport" content="width=device-width, initial-scale=1">
      <meta name="robots" content="noindex, nofollow" />
      <script src="fragmentRedirect.js" type="text/javascript"></script>
    </head>
    <body>
      <nav>
        <a href="/">Home</a>
        <a href="/cats.html">Cats</a>
        <a href="/fish.html">Fish</a>
        <a href="/chickens.html">Chickens</a>
      </nav>
    </body>
    </html>
    

    The next step is to load our navigation into our home page so let’s create the index.html file for our website including the disappearingFrame.js script we made previously. Note the aria-live and aria-busy tags I used to mark for screen-readers where the content will be changing. This time I used aria-live="polite" to notify the user, since navigational elements are pretty important.

    <!DOCTYPE html>
    <html lang="en"><head>
      <meta charset="utf-8">
      <meta name="viewport" content="width=device-width, initial-scale=1">
      <title>A framed* website</title>
      <link rel="stylesheet" href="./style.css" />
      <script src="disappearingFrame.js" type="text/javascript"></script>
    </head>
    <body>
      <main>
        <header aria-live="polite">
          <h1>A framed<sup>*</sup> website</h1>
          <iframe aria-busy="true" 
            src="/_navigation.html"
            title="main navigation links"
            onload="disappear(this)"></iframe>
        </header>
      </main>
    </body>
    </html>
    

    This is what have so far, but if you’re following along with your own code you might have noticed something as it loaded. A flash of white and the size of the header shrinking and expanding as we showed the iframe and then removed it after adding in the elements. Let’s fix that.

    a screenshot of a website featuring my favorite pets. It is empty except for the main navigation elements and the title

    Luckily the white flash has been solved before and StackOverflow was quick to point me in the right direction. It actually does something similar to what we did with iframes. It creates a script tag to hide the iframe and then when everything is loaded it re-shows the iframe. Why do that in JavaScript and not use css? Because if a user has JavaScript disabled the iframe will remain visible, which is what we want. We also don’t need to make the iframes visible at the end, because we remove them when we are done copying the content. Let’s add that to our disappearingFrame.js file. Notice it’s using the IIFE pattern. Here’s what the script file looks like now:

    // Hide the white flash of an iframe loading 
    (function () {
        let div = document.createElement('div');
        let ref = document.getElementsByTagName('base')[0] || 
                  document.getElementsByTagName('script')[0];
    
        div.innerHTML = '<style> iframe { visibility: hidden; } </style>';
        ref.parentNode.insertBefore(div, ref);
    })();  
    
    // Load an iframes content into the DOM
    function disappear(frame) {
      let body = (frame.contentDocument.body || frame.contentDocument);
      let children = [...body.children];
      for(let child of children) {
        frame.before(child);
      }
      frame.remove();
    }
    

    That got rid of the flash… but what about the height issue? Since the height is variable based on what you’re inserting the best way to deal with it is to set the height of the iframe to the height of the content or the parent container with some css. Here I set the height of the header with a style tag. I added a little dummy content and this is what we have for index.html.

    <!DOCTYPE html>
    <html lang="en"><head>
      <meta charset="utf-8">
      <meta name="viewport" content="width=device-width, initial-scale=1">
      <title>A framed* website</title>
      <link rel="stylesheet" href="./style.css" />
      <script src="disappearingFrame.js" type="text/javascript"></script>
      <style> body > header { height: 229px } </style>
    </head>
    <body>
      <header aria-live="polite">
        <h2>A framed<sup>*</sup> website</h2>
        <iframe aria-busy="true" 
          src="/_navigation.html"
          title="main navigation links"
          onload="disappear(this)"></iframe>
      </header>
      <main>
        <header> 
          <h1>My favorite pets</h1>
          <p>This website is dedicated to some of the wonderful pets
          I've had over the years.</p>
        </header>
      </main>
    </body>
    </html>
    

    Next we’ll add the footer, which is also a fragment. This one is easy.

    <!DOCTYPE html>
    <html lang="en">
    <head>
      <meta charset="utf-8">
      <meta name="viewport" content="width=device-width, initial-scale=1">
      <meta name="robots" content="noindex, nofollow" />
      <script src="fragmentRedirect.js" type="text/javascript"></script>
    </head>
    <body>
      <p>Built with 💖 by heyloura</p>
    </body>
    </html>
    

    So the final index.html file is this

    <!DOCTYPE html>
    <html lang="en"><head>
      <meta charset="utf-8">
      <meta name="viewport" content="width=device-width, initial-scale=1">
      <title>A framed* website</title>
      <link rel="stylesheet" href="./style.css" />
      <script src="disappearingFrame.js" type="text/javascript"></script>
      <style> body > header { height: 229px } </style>
    </head>
    <body>
      <header aria-live="polite">
        <h2>A framed<sup>*</sup> website</h2>
        <iframe aria-busy="true" 
          src="/_navigation.html"
          title="main navigation links"
          onload="disappear(this)"></iframe>
      </header>
      <main>
        <header> 
          <h1>My favorite pets</h1>
          <p>This website is dedicated to some of the wonderful pets
          I've had over the years.</p>
          <figure>
            <img alt="Orange tabby cat in the center of a lit Christmas tree" 
                 src="/photos/christmas_cat.jpg" />
            <figcaption>
    	        This is the cat who tried his best to knock down my Christmas tree.
            </figcaption>
          </figure>
        </header>
      </main>
      <footer aria-live="off">
        <iframe aria-busy="true" 
          src="/_footer.html"
          title="the footer credits of the website"
          onload="disappear(this)"></iframe>
      </footer>
    </body>
    </html>
    

    Which results in this:

    Screenshot of the website we are building with navigation, footer, and a cat stuck in a Christmas tree for content.

    Update website navigation to highlight the current page.

    We should probably indicate what page the user is on. But how can we do that if the navigation is in an iframe? Good question! Turns out you can, assuming you can use a little JavaScript, but we’ll need to adjust a few things first.

    Let’s test if we can pull a script tag and have it run when the content is pulled in from the iframe. Let’s adjust the _navigation.html file and put a script at the bottom. Also let’s make sure we don’t run it in the iframe, only outside of it by checking if window.top === window.self that way we can test if it works.

    <!DOCTYPE html>
    <html lang="en">
    <head>
      <meta charset="utf-8">
      <meta name="viewport" content="width=device-width, initial-scale=1">
      <meta name="robots" content="noindex, nofollow" />
      <script src="fragmentRedirect.js" type="text/javascript"></script>
    </head>
    <body>
      <nav>
        <a href="/">Home</a>
        <a href="/cats.html">Cats</a>
        <a href="/fish.html">Fish</a>
        <a href="/chickens.html">Chickens</a>
      </nav>
      <script>
        <!-- Don't run code when in the iframe -->
        if(window.top === window.self) {
          alert('Hello World!');
        }
      </script>
    </body>
    </html>
    

    Uh oh, that didn’t work. Turns out just inserting a script tag doesn’t work because of security concerns. Maybe that’s something the parent page can take care of when it’s pulling in the elements? Let’s give it a shot.

    What we need to do is detect if the element we are going to insert is a script tag. Luckily we have a property that tells us that, element.tagName and then we can do the trick we used to suppress the white flash of an iframe loading.

    1. Create a script element.
    2. Take the contents from the iframes script tag and append it to that script.
    3. Append it to the head of the document, which causes the script to run.
    4. Then we can remove it (or not).

    So here are the change to the disappearingFrame.js file:

    // Hide the white flash of an iframe loading
    (function () {
        let div = document.createElement('div');
        let ref = document.getElementsByTagName('base')[0] || 
                  document.getElementsByTagName('script')[0];
    
        div.innerHTML = '<style> iframe { visibility: hidden; } </style>';
        ref.parentNode.insertBefore(div, ref);
    })();  
    
    // Load an iframes content into the DOM
    function disappear(frame) {
      let body = (frame.contentDocument.body || frame.contentDocument);
      let children = [...body.children];
      for(let child of children) {
        if(child.tagName === 'SCRIPT'){
          let script = document.createElement("script");
          script.text = child.innerHTML;
          document.head.appendChild( script ).parentNode.removeChild( script );
        } else {
          frame.before(child);
        }
      }
      frame.remove();
    }
    

    Sweet! We got the alert that time. This means we can include scripts in our fragments and then execute them. This opens up possibilities I’ll explore in the next post.

    So to mark our page as the current page in the navigation we can piggyback on the accessibility tag to mark the current page aria-current="page" attribute. Plus our stylesheet already styles anchor elements that have that attribute. But now we have a choice add the attribute during the iframe load or once it’s in our parent page. To keep things simple and scoped, I’m going to set the attribute from within the iframe. We’ll just need to swap around the condition of the iframe. Note: when you pull in the script tag to the parent document, the document is the parent. So you’ll need to be careful with using selectors.

    <!DOCTYPE html>
    <html lang="en">
    <head>
      <meta charset="utf-8">
      <meta name="viewport" content="width=device-width, initial-scale=1">
      <meta name="robots" content="noindex, nofollow" />
      <script src="fragmentRedirect.js" type="text/javascript"></script>
    </head>
    <body>
      <nav>
        <a href="/">Home</a>
        <a href="/cats.html">Cats</a>
        <a href="/fish.html">Fish</a>
        <a href="/chickens.html">Chickens</a>
      </nav>
      <script>
        // check that we are in the iframe.
        if(window.top != window.self) {
          let url = document.referrer.substring(document.referrer.lastIndexOf('/') + 1);
          let navs = document.querySelectorAll('a');
          for (let nav of navs) {
            if(nav.getAttribute('href') == `/${url}` || 
                 (nav.getAttribute('href') == '/' && url == 'index.html')) {
              nav.setAttribute('aria-current','page')
            }
          }
        }
      </script>
    </body>
    </html>
    

    What we are doing, is that if we are in the iframe, grab the anchor tags and loop through them. Check to see if the end part of the url matches the anchor tag href. We can get the url string from the document.referrer but only if the iframe source is on the same primary domain as the parent page. You can click between the pages to see the highlighted navigation anchor change. Pretty sweet!

    Don’t forget about the no-JS crowd

    Now that we got something built, let’s see how it does if we turn JavaScript off. Everything looks fine, though the iframe pieces are not styled the same. This can be taken care of by adding a bit of styling to the head section of the iframe and in the parent setting an appropriate width and height. But what happens if you click to change a page in the navigation? Disaster!

    A screenshot of the website we are building showing the nested navigation if you click when JavaScript is turned off.

    Turns out, the solution to this is pretty easy. Remember how we’re checking if the iframe is the top window in our JavaScript? You can tell anchor tags to open in the top window, by giving them the right target target="_top" so let’s make those changes.

    <!DOCTYPE html>
    <html lang="en">
    <head>
      <meta charset="utf-8">
      <meta name="viewport" content="width=device-width, initial-scale=1">
      <meta name="robots" content="noindex, nofollow" />
      <script src="fragmentRedirect.js" type="text/javascript"></script>
    </head>
    <body>
      <nav>
        <!-- For navigation elements make sure you add target="_top" to the anchors -->
        <a href="/" target="_top">Home</a>
        <a href="/cats.html" target="_top">Cats</a>
        <a href="/fish.html" target="_top">Fish</a>
        <a href="/chickens.html" target="_top">Chickens</a>
      </nav>
      <script>
        if(window.top != window.self) {
          let url = document.referrer.substring(document.referrer.lastIndexOf('/') + 1);
          let navs = document.querySelectorAll('a');
          for (let nav of navs) {
            if(nav.getAttribute('href') == `/${url}` || 
                 (nav.getAttribute('href') == '/' && url == 'index.html')) {
              nav.setAttribute('aria-current','page')
            }
          }
        }
      </script>
    </body>
    </html>
    

    And done!

    TL;DR

    Using our disappearing iframe trick we can build a basic website where the navigation and footer are in separate html pages. I’ve also shown how you can pull in Javascript from these iframes and execute it on the parent page. You can check out the result here: code - preview.

    Next Steps

    You can use this technique to build a basic website and split frequently repeated portions into their own fragments. Things like navigation, footers, page headers or other repeated content. The method is pretty simple and removes some of the major drawbacks the retro frame system people used in the early web. But it’s also a little more powerful than that, we now have a system that we can create a “component” with… styles, html, and css all in one place. No need for a component framework, or the overhead, of something like Svelte, Vue or React and no need for anything server-side either. To challenge how far this can hold up I’m going to build a basic productivity app with this method. So stay tuned.

    1. Let’s code something experimental… an introduction
    2. An experimental take on the retro website frames… disappearing iframes with vanilla-js, html, and css
    3. A basic framed website… more experiments with disappearing iframes (you are here)
    4. Coding a framed* productivity app - building out the calendar
     #code  #Longform 
  • An experimental take on the retro website frames... disappearing iframes with vanilla-js, html, and css

    An experimental take on the retro website frames… disappearing iframes with vanilla-js, html, and css

    Want to follow along? You are going to need some basic familiarity with JavaScript, html, css, and you will need a code editor. Also the files will need to be served from a webserver and not the local file system. For quick projects like this I use Glitch. Why won’t it work? Because of iframe security restrictions.

    Let’s Get Started

    If you recall from my introduction post, framed websites have three main issues:

    1. You might navigate to the fragment page itself, thus seeing an incomplete website.
    2. Search engines wouldn’t/didn’t search the content in frames, thus impacting a sites SEO.
    3. Accessibility concerns, especially for screen readers, who can’t detect changes in one frame impacting another frame.

    So how can we bypass some of those issues? Let’s tackle the first one. We want to make sure that a “fragment” page isn’t accidentally indexed by search engines. Which is pretty simple to do. You can include a robots no-follow directive <meta name="robots" content="noindex, nofollow" /> in the the head section of the page. Like this:

    <!DOCTYPE html>
    <html lang="en">
    <head>
      <meta charset="utf-8">
      <meta name="viewport" content="width=device-width, initial-scale=1">
      <meta name="robots" content="noindex, nofollow" />
    </head>
    <body>
    
    </body>
    </html>
    

    We also want to make sure that the website fragment isn’t linked to directly in the website, it needs to be in an iframe. That comes down to the website creator being careful while coding. But if JavaScript is allowed we can redirect the user back to the main website in case someone loads it on its own.

    What we want is to immediately invoke a function expression, IIFE, that checks if the fragment page is running in an iframe, the method we are going to use to embed it, and if it is not, redirect the user. So how can we tell if it’s in an iframe? We can use the window object. We can check to see what the top window is, and if it’s the iframe we should bail i.e. window.self === window.top and redirect the user. We can put this right in the head section of the document so that the redirect happens as fast as possible.

    <!DOCTYPE html>
    <html lang="en">
    <head>
      <meta charset="utf-8">
      <meta name="viewport" content="width=device-width, initial-scale=1">
      <meta name="robots" content="noindex, nofollow" />
      <script>
        ;(function () {
          if(window.self === window.top) {
            window.location.replace("/");
          }
        })();
      </script>
    </head>
    <body>
    
    </body>
    </html>
    

    So now we’ve mostly taken care of the first point and as long as the website creator is careful to not link to frame sources directly we should be in a pretty good spot.

    Now to make things a little less busy in our fragment page, let’s put the script in it’s own file, I’m calling mine fragmentRedirect.js and we will call the fragment _pets.html since I’m going to have it list some common pets. The underscore is just a naming notation I am following to tell me at a glance that this is not a standalone html page, but a fragment of one meant to be embedded.

    <!DOCTYPE html>
    <html lang="en">
    <head>
      <meta charset="utf-8">
      <meta name="viewport" content="width=device-width, initial-scale=1">
      <meta name="robots" content="noindex, nofollow" />
      <script src="fragmentRedirect.js" type="text/javascript"></script>
    </head>
    <body>
      <p>Common pets:</p>
      <ul>
        <li>Cats</li>
        <li>Dogs</li>
        <li>Fish</li>
      </ul>
    </body>
    </html>
    

    The disappearing iframe

    What if we could take the body of the iframe and replace itself in the parent document? Then there would be no frame to get in the way of seo and accessibility. This is something we can do, but we’re going to need JavaScript to do it.

    For security reasons this will only work if your iframe sources are on the same website domain. Why? CORS. So no using this trick to get third-party content 🙃

    I’m assuming you can set up a basic index.html page to be the root of the website. This is my starting page with a catchy title. The <sup> tag, is the superscript tag, which makes the asterisk small and aligned to the top of the line. One of the easiest ways to help with accessibility is to use the semantic HTML5 tags. With the added bonus that they make the HTML easier to read.

    <!DOCTYPE html>
    <html lang="en">
    <head>
      <title>A framed* website</title>
      <meta charset="utf-8">
      <meta name="viewport" content="width=device-width, initial-scale=1">
    </head>
    <body>
      <main>
        <header><h2>A framed<sup>*</sup> website</h2></header>
      </main>
    </body>
    </html>
    

    We should put in a bit of styling. I prefer small classless css libraries so I added in Simple.css. You can download it and then host it, my preference is to put it in a file named style.css or you can link to the CDN. Let’s also embed the website fragment, _pets.html, we made above. Notice the iframe has a title, that’s for accessibility. It lets a screen reader know what it can expect to find in your iframe.

    <!DOCTYPE html>
    <html lang="en">
    <head>
      <title>A framed* website</title>
      <meta charset="utf-8">
      <meta name="viewport" content="width=device-width, initial-scale=1">
      <link rel="stylesheet" href="/style.css" />
    </head>
    <body>
      <main>
        <header><h2>A framed<sup>*</sup> website</h2></header>
        <iframe 
    	    src="/_pets.html"
    	    title="a list of common pets"></iframe>
      </main>
    </body>
    </html>
    

    Let’s take a look:

    Not too bad. We can see our list of common pets on the page. You can see the content even if JavaScript is off, which is excellent. But it’s still in an iframe.

    a screenshot of the website from the above html that has the title 'A framed website' and a list of common pets

    We’re going to need to add some JavaScript for this next part, making it disappear. And I don’t mean deleting it. I mean taking the content of the iframe, appending it into our parent page, and then deleting the iframe. Here’s a screen shot of what I mean:

    two screenshots of the website with code-behind showing. One has the iframe tag still in it and the other doesn't

    Now the iframe tag has an onload attribute that you can use to execute some JavaScript when it’s done loading. Which is exactly what we want. I avoided the addEventListener method because there is a chance that by the time that even listener gets added, the iframe content is already loaded. I got the idea to make the iframe disappear from this blog post HTML Includes That Work Today | Filament Group, Inc. and tweaked the method.

    <!DOCTYPE html>
    <html lang="en"><head>
      <meta charset="utf-8">
      <meta name="viewport" content="width=device-width, initial-scale=1">
      <title>A framed* website</title>
      <link rel="stylesheet" href="./style.css" />
      <script>
        function disappear(frame) {
          let body = (frame.contentDocument.body || frame.contentDocument);
          let children = [...body.children];
          for(let child of children) {
            frame.before(child);
          }
          frame.remove();
        }
      </script>
    </head>
    <body>
      <main>
        <header>
          <h1>A framed<sup>*</sup> website</h1>
        </header>
        <iframe 
    	    src="/_pets.html"
    	    title="a list of common pets"
            onload="disappear(this)"></iframe>
      </main>
    </body>
    </html>
    

    The disappear function first tries to find the body element of the loaded iframe and from that the children elements. The children nodes are a live list that reflect the changes in the DOM. Which means, to be safe, we should copy this into an array first. Then we iterate over the children and into the DOM of the parent page using frame.before(). The final step once everything is copied over is to remove itself from the DOM with frame.remove(). Now there are quite a few improvements we can make to that function and some needed error checking, but for right now it gets the job done.

    SEO and accessibility concerns

    What about SEO and what about accessibility? The biggest issue with both is that they are not aware of dynamically loaded content. Though in 2023 the big search engines do crawl sites loaded with content via JavaScript. I couldn’t find any concrete sources, but my searching seemed to indicate that as long as the content updated dynamically happens quickly then there shouldn’t be a problem indexing it. But just in case, leave the content rich portions of your website out of the framed fragments.

    Now onto accessibility. A lot of accessibility issues come from the markup of the HTML and leaving important attributes off of tags. People seldom fill out the alt tags on images or if they do, then not in a meaningful way. Using semantic html tags also helps with accessibility There are also aria- attributes that can be added to tags to further increase accessibility.

    The biggest accessibility drawback to this disappearing iframe approach is that there is no notification, that say a screen reader detect, to the change when the iframe content is pulled in and the iframe deleted. So we’re going to need to tell it. There is an aria-live tag that let’s screen readers and assistive technology know that a region of the page is dynamic and an aria-busy attribute which helps indicate what is being actively modified. The aria-live tag isn’t something you want to add in dynamically, so I put it on a section tag around the iframe that I marked with the aria-busy attribute. You may of noticed I set aria-live="off". This simply means the screen reader won’t interrupt the user with the update unless they are focused on that element. We could use aria-live="polite" if we wanted to tell the user. But avoid aria-live="assertive" since that’s really only for critical updates and interrupts the screen reader.

    The JavaScript for the frames I moved into a file called disappearingFrames.js and I linked it in the head of the html document. Here is the final result of the index.html page:

    <!DOCTYPE html>
    <html lang="en">
    <head>
      <title>A framed* website</title>
      <meta charset="utf-8">
      <meta name="viewport" content="width=device-width, initial-scale=1">
      <link rel="stylesheet" href="/style.css" />
      <script src="disappearingFrames.js" type="text/javascript"></script>
    </head>
    <body>
      <main>
        <header><h2>A framed<sup>*</sup> website</h2></header>
        <section aria-live="off">
    	  <iframe aria-busy 
    	    src="/_pets.html"
    	    title="a list of common pets"
    	    onload="disappear(this)"></iframe>
        </section>
      </main>
    </body>
    </html>
    

    TL;DR

    You can make iframes disappear using JavaScript by appending the contents to the parent page (same domain restriction applies). We can use this as the start of template system for a website. You can check out the result here: code - preview.

    Next Steps

    So now we have a small proof of concept that has a different approach on using iframes in a framed website context. But to make sure this really works, we need to build something a bit more substantial. So next up, let’s put together a basic website with this approach.

    1. Let’s code something experimental… an introduction
    2. An experimental take on the retro website frames. (you are here)
    3. A basic framed* website… more experiments with disappearing iframes
    4. Coding a framed* productivity app - building out the calendar
     #code  #Longform 
  • Let's code something experimental... an introduction

    If you can’t tell from my blog design, I’ve been on a bit of a retro website kick. I find them nostalgic and fun and I kind of miss the days where personal websites were a surprise to look at. A few weeks ago I was wasting some time browsing on Neocities when I came across an old-school framed website. A website that kept its structure, like navigation, in separate html files that were then loaded into the main page with frames. What a blast from the past. But that got me thinking, why did we move away from them?

    Well, one frustrating search later and the consensus seems to be that:

    1. You might navigate to the template? fragment? page, thus seeing an incomplete website.
    2. Search engines wouldn’t search the content in frames, which impacted a sites SEO
    3. Then the accessibility concerns, especially for screen readers, who can’t detect changes in one frame impacting another frame.

    Okay, well then… what were the strengths? People used them for a reason after all.

    1. Without modern tools or a back-end server, website creators had to copy the same structure over-and-over for every page of their website. So if they added a new navigation link… they needed to update every page that they had. Frames got rid of that. Define your navigation in one place and just link that in all your other files.
    2. Frames reduce bandwidth and server load, because the same content does not need to be loaded every time.

    Now that first strength stood out to me and itched at the back of my brain. Then came a blog post from Chris over at Go Make Things: Modern developer tooling is bad for developers, actually which is something I’ve been thinking about over the last few years. Along with how almost everything in web development is complicated, fragile, and inaccessible to the lay person.

    So then I thought about frames again… and I opened a code editor and started playing around. I wanted to build something, that didn’t require build tools or other modern tooling, but still had that self-contained feel that Svelte and Web Components brought into my life, specifically that the css, js, and html are all in one place. I wanted no dependencies and something flexible enough that it could be a static website/blog, functional without JavaScript, or maybe even a basic web application (with some JavaScript).

    I came up with something I kind of dig. It’s not polished and a little bit strange, but I’m going to share it anyway with a series of blog posts every few days. I’m calling it framed*.

    1. Let’s code something experimental… an introduction (you are here)
    2. An experimental take on the retro website frames.
    3. A basic framed* website… more experiments with disappearing iframes
    4. Coding a framed* productivity app - building out the calendar

    A good idea? Maybe, maybe not. A fun one to scratch a coding itch? Yes!

    Hope you enjoy 🤪

     #code  #Longform 
  • Idea: Mini-adventure cards

    I’m rather excited to run a Dungeon Crawl Classics game in a couple weeks. I’ve been making some mini-adventure cards to have on hand for inspiration. After trying out a couple of card sizes I think I like the 5inx7in format the best.

    Journal page with 5in by 7in rectangle containing an adventure concept and map for a Dungeon Crawl Classics game.
     #meta-toc  #Fun & Games  #Longform 
  • Logseq or Obsidian, I can't decide

    About a month ago I decided that I wanted to try Logseq. I had downloaded Obsidian earlier in the year and never really used it and mostly forgot about it. Until I was inspired to clean up my digital subscriptions back in April. One thing I did was cancel my budgeting solution, YNAB, and start building out my own little budget tracker. Another part of that was letting go of Notion. While I really enjoyed using Notion, I didn’t feel like I used it enough to justify paying for it and it had become so overgrown I felt lost and discouraged when I opened it. So I went looking for something that would fill that knowledge management gap.

    Logseq

    I downloaded Logseq to try it out and kept with it for a little over two weeks to get a feel for it. I watched lots of videos, I tested out various ways of organizing my information and taking daily notes.

    The Good

    I love the outlining first approach. It’s how I naturally approach taking notes on paper so having first class support for it out of the box was wonderful. I loved how the daily notes were all on the main page and scrollable. I enjoyed the built in todo’s and time tracking. It felt a lot more effortless then Obsidian to put in information. Here is a screenshot, from the Android application, of the home screen. Clean and simple.

    I wrote far more in Logseq then I did in Obsidian during its two week trial. It was more effortless and it might be silly but those little bullet list icons really help me. I really enjoyed how detailed the “Linked” and “Unlinked” references are in Logseq, and how you could change information within those linked references and it doesn’t make you navigate screens like it does in the Obsidian app.

    The Bad

    The query language frustrated me to no end. I love being able to quickly tweak a dataview, plugin needed, in Obsidian. In logseq the documentation, videos, and tutorials all around queries are lacking. So if I were to go all in with Logseq that’s something I’d need to rectify to really harness Logseq’s power. Here’s what I mean.

    Files, files, files. Logseq creates markdown files for you every time you tag something. And keeping those files in sync across devices I found pretty frustrating. I’m using Syncthing, because I’m trying really hard not to pick up any new subscriptions, and I kept losing files or having lots of empty ones appear with partially typed out file names. It was pretty bad on the Android app, where if the app lost focus while you were typing in a tag, it will make an empty page… even if you haven’t finished typing the name out.

    If you go under the hood and view the files they are all in one directory with no organization. I know that shouldn’t bother me, but it kinda does.

    Those frustrations and the fact that I couldn’t make a quick expense tracker, since I don’t have the query chops yet, convinced me to give Obsidian a two week trial as well.

    Which brings me to the last con on my list. Logseq, since it’s outliner based, starts everything with a list in Markdown. That annoyed me when bringing my files over to Obsidian.

    Obsidian

    I loved how I was able to quickly import my Johnny Decimal folder structure into Obsidian and feel right at home. I also enjoyed the numerous tutorials that I found. There are far more video tutorials for Obsidian then there are for Logseq. There was even a built in expense ledger, though I had to abandon it when I learned it didn’t work on mobile devices.

    It didn’t take much time at all to create a little budget tracking system in Obsidian either. Which I’ll write up in detail at somepoint and post here on my blog. All it took was a couple of plugins, DataView and QuickAdd and I was off.

    The Good

    In Obsidian you have full control over the files it makes and you are able to organize them how you like. You can kinda/sorta use namespaces in Logseq to get something similar, but it’s not really. Plus I had a much easier time keeping files across my phone and my linux computer synced. Also, Obsidian syncs the plugins and theme setup as well. Which makes it more consistent across devices.

    There are so many plugins and some of them a really powerful. Plus there is one for Micro.blog called Micro.Publish. I used it after writing up this up to upload it as a draft 😊.

    The Bad

    I just haven’t been using Obsidian to write and connect things. There’s something to be said about just writing stuff down and not worrying where the file will physically end up, which is Logseqs' approach to knowledge management. My daily notes right now in Obsidian are really just my list of expenses and a couple of tasks. Even after spending a dedicated timr making sure i was using bullet points when note taking, it didn’t help.

    So What Now?

    I have no idea 😆. Half the purpose of writing this out was to help me figure it out. I am certain that I don’t want to use both. I want simple, and not wondering where I should put something. I have more cons listed for Logseq but when it came down to it, I did use it more.

    Feel free to leave me a comment down below if you’ve used either of these apps and what your thoughts are.

    Thanks for reading - Loura

     #Longform 
  • Session One - Portal Under the Stars - 1.1

    This contain spoilers for the Dungeon Crawl Classics level 0 funnel adventure The Portal Under the Stars by Goodman Games

    To go to the start of this adventure visit my post - Dungeon Crawler Classics - Solo Play

    Session One

    portal in the trees during a starry night with a doorway

    Being a peasant is hard but maybe your luck is about to turn around. The stars have aligned in a strange pattern and that old tale you heard so long ago maybe wasn’t as foolish as you thought. Sure enough there is a shimmering portal right in front of you, just outside of town near that old and strange rock formation. There are riches there, you’re sure of it. And you’re not so sure it’ll still be there if you take the time to wander back home and grab more supplies. It’s been a hard and long winter and didn’t the tale promise vast riches inside? You decide it’s time to take a chance and make it big. So you step through the strange bluish light and to your utter astonishment it looks like a good dozen or more of the town’s folk had the same idea as you. You shuffle closer towards them into the stone hallway and unconsciously group up next to some familiar faces. At least you don’t need to ransack the crazy war-wizard’s hideout alone.

    The Not So Brave Adventure Party

    With some hushed arguments and a fair amount of shoving all sixteen brave-ish souls eventually formed four groups and one “lucky” soul was picked to march in front. You did notice that the crafty and more persuasive folks weren’t the ones out in front. They made themselves cozy in the back of their groups. Also, there were a few animals milling about as well. Who ever heard of a cow brought along in ransacking a dungeon? And was that a falcon on the elf’s arm? You grip your own “weapon”. It was better than nothing, and from the sounds of it your group was ready to begin exploring this hall and the strange door at the end of it.

    Group One Group Two Group Three Group Four
    Golda
    Woodcutter
    Gared
    Caravan guard
    Fred
    Dwarven miner
    Thudle
    Dwarven miner
    Mara
    Halfling chicken butcher
    Wisia
    Turnip farmer
    Walter
    Rice farmer
    Leth
    Fortune-teller
    Rime
    Butcher
    Reda
    Dwarven miner
    Oror
    Elven artisan
    Mabell
    Fortune-teller
    Palard
    Halfling glovemaker
    Browe
    Wheat farmer
    Anelen
    Elven falconer
    Clatte
    Wizard’s apprentice

    Area 1.1 - The Portal Entrance

    While you waited for anyone to do anything, you appreciated how the entrance faded from the stone ruins you came in from to seamlessly becoming solid flagstones under your feet. Even the starlight filtered in from behind you. Down the hallway you could see that there was a large solid wooden door. It appeared to be banded with iron and was decorated with jewels in an odd assortment of star shapes and some unreadable inscription. You’d need to get closer to the door to figure out if that pattern meant anything. Your group came up with a plan and from the muttering around you it sounds like the other groups did as well. Even though you all had a rough game plan, nobody wanted to take the first step further inward. Eventually Gared, leading group two began heading to the door.

    Group Initiative Action One Action Two Action Three
    One 17 inspect the entrance go to door inspect the door
    Two 18 go to the door look for traps try and open door
    Three 4 study the star shapes on door inspect the hallway check back on entrance
    Four 16 check hall for traps inspect the door open the door

    You watched as he jostled the door handle. Locked. Another group attempted to find hidden clues around the entrance, but came up empty (DC 14, rolled 5). There were no traps in the hallway, group four deduced this fact given that the second group waltzed right over to the door. But they double checked it anyway. The last group sent their best and brightest to decipher the meaning behind the door’s inscription (DC 20, rolled 13) but even they couldn’t make any sense of it. So everyone tried again, each replacing each other and trying anew. But once again all failed in their endeavor.

    At last Gared attempted to pry open the door with brute strength. As a caravan guard one would think he could handle breaking open a door, but alas, his muscles failed him. He made a good show of it to impress the others (DC 15 STR, rolled 3) but his terror at what might lie behind the door caused him to falter in his task. While the groups wandered about the hallway and argued over who should try forcing open the door again, Walter, once again near the entrance, had a sudden flash of insight. The stars on the door were constellations! And in fact, in just a couple of hours the sky outside would probably match that pattern.

    You’re not sure whether Walter convinced the others to wait the couple of hours to try opening the door, or if it just took that long for Gared or anyone else to overcome their fear enough to try and break the door open again. But either way, when Gared finally grabbed the door handle, the door swung open effortlessly and beyond it lay another dark hallway.


    Wearing my DM hat: Mon did I roll poorly for the characters. But luck saved the day and they got through unharmed by the trap on the door, which would have triggered if it had been forced open. The poor peasants have gained 1 XP. Below are the notes I took as I was working through

     #Fun & Games  #Longform 
  • Dungeon Crawler Classics - Trying Out Solo Play

    I haven’t played a good table-top, dice slinging, rpg game in about six years. So the urge to play has been building for a while. But my schedule is absolutely packed to the brim and my old game friends also have schedules that are equally packed. There isn’t a way to fit in a gaming session with any regularity. Then Wizards of the Coast pissed off a huge portion of the D&D community with some rumored changes to their OGL and I decided to look around and see what else was out there. I came across several new-to-me rpg systems and I wanted to give them a try. Could I somehow play one by myself? Turns out many others have had the same thought and there are quite a few different ways to go about it.

    I could look for a system geared towards solo play or pick up an indie pdf that “solo-izes” a typical group play system. There are also random tables galore on the web that I could roll against and techniques of using dice to answer “yes/no” or likert scale questions to try and run my own campaign… with myself.

    But what I wanted was to play Dungeon Crawl Classics with the free pdf lite rules and the little adventure printed in the back. I did see another blog post of someone else trying this out. You can see it here Portal under the Stars – DCC RPG but I didn’t read much of the post since I didn’t want to spoil the adventure.

    So I’m gonna give it a shot and jot down how I’m approaching solo play and what’s happening to my poor party as they enter the dungeon.

    Solo Play Approach

    • Dungeon Crawler Classics uses a dungeon against a randomized group of level 0 peasants to generate characters. This process is called the funnel. I used the Purple Sorcerer - 0-Level Party & Tourney Generator to roll up 16 characters and then used a random fantasy name generator to give them names. Any character that makes it out alive can become a proper level one character and is ready to have more adventures.
    • I kept my characters grouped as they were on the random generator printout, which printed them out, four to a page.
    • I’m printed out the adventure and covered it with sticky notes. The only thing visible to start is the italicized player introduction text.
    • My initial approach is to write down a series of actions (max 3) for each group that they would do based off of the introduction text/room text. I’ll also roll and record the initiative at the group level.
      • I determined the marching order for each group and assumed that the one in the lead is the one taking point on any action that is happening. I also am assuming that my group remains clustered together as they explore.
      • Then I’ll reveal the next paragraph of text and try to resolve it with the actions I already planned out.
      • Combat will interrupt my table of actions and take precedence. Based on what they characters were doing I’ll know if they are surprised or not (at the group level) and I already have initiative. If characters needs to make a decision, say to run one way or another or to attack back, I will roll a dice to determine what they do.

    Session Play Logs

    I expect this adventure to take me a bit to finish. Both because I’m juggling 16 characters and because I’ll probably only be able to fit in 20-30 minutes of play time here and there.

    When I finish a session I’ll post them and then update this section with a link.

     #meta-toc  #Fun & Games  #Longform 
  • Season 37 Episode 48 of My Life

    Some weeks really do pass by in a blur. I think it’s because I tend to “go-go-go” and then collapse down to rest at the end of the day. This week was once again no exception. There is finally some movement on our condo sale and my original plan on Monday, to attend an important town meeting, was waylaid by the need to quickly check all the fire alarms in the unit, repair bleach damage on the wood floors the tenants left and get every room broom clean for a mortgage lenders quick inspection the next day. Why the buyers waited to the day of the mortgage commitment clause in our agreement to say they needed an inspection is a source of much frustration on my part. Thank you Panera Bread for having an app to place an order for dinner otherwise the kids wouldn’t have gotten anything to eat until after 9pm and thank you to my husband for working with me to tackle “all the things”. Tuesday wasn’t much better since I had to get over to the condo during the work day to let them come and inspect the place. Luckily everything seemed to go without a hitch. But since things are moving forward, quickly, like in less then two weeks quick, we had a large influx of very important things that must be done as soon as possible.

    I’m not sure if it was Tuesday evening or Wednesday when my brain fully processed that Thanksgiving was basically a week away and since I’m hosting I better start to get my act together. I think I’ve got a tasty menu planned now and if being ridiculously overcharged for beets on Sunday is the biggest hitch I’ll count myself lucky. But that does mean that me tearing apart my daughter’s room a few weeks ago to repaint it wasn’t the brightest idea, timing-wise, that I’ve ever had. It did occur to me that finishing painting her room, assembling the new furniture for it, painting the trim on three windows in the my office space, cleaning the house, braving the crowds at the grocery store the weekend before Thanksgiving, and driving three hours to do a play date visit is probably too much for my husband and I. So I did take two of those things off that list 😆.

    The other highlight of the week was the aforementioned play date. Well, less of a playdate and more of a meetup for other kids that are also in the virtual homeschooling group my kids attend. It was tucked away in the woods by a lake with a large fire to keep everyone warm. The fire was much needed too, by the time we left I was a popsicle. But it was amazing for my kids to connect in-person with kids they’ve only interacted with over zoom meetings. There was running around, adventuring in the woods, laughing over snacks, and even a zombie apocalypse game for the kids. It made me feel a lot better about my choices to talk with others facing the same issues and exploring off-the-beaten-path way of educating children. This year homeschooling has been our best yet.

    Now, is the keep it real part of this weekly recap. It’s been an emotional week for me. Things in my immediate family feel irreparably broken. It’s hard to not write in my own value judgements since it is so personal and emotionally charged. But suffice it to say that after a hard year I was looking forward to a simple holiday with my parents. My parents declare that, in the name of fairness, they will invite all the children to holiday gatherings. Which means, given my boundaries around one of my siblings, I’m not attending. And may never get to attend again and man that sucks… My parents are well within their rights to invite whomever they want and I’m well within my rights to maintain a hard boundary against an abusive sibling. But that’s a cold comfort to have. So I’ll host for my sister and my mother in law and try my best to have it light and fun for the kids. But damn it hurts.

    Okay, that over with, there were some other nice things that happened this week: A get together with a friend and her foster child at the park, movies and pizza for my kids and some of their cousins, getting a little further in the game Tunic (which is awesome by the way), figuring out how and why all my unit tests at work were failing, having a blast a tap dancing, going out for coffee with my sister, catching up with an old friend and being hopeful that once this condo sale goes through we can rekindle the friendship.

    So that’s what’s been going on.

    Until next time, Loura

     #Longform 
@heyloura: ~/weblog/posts cat categories
@heyloura: ~/weblog/posts $

@heyloura@heyloura.com

@heyloura: ~ cat credits.md
@heyloura: ~ $

@heyloura@heyloura.com

@heyloura: ~ cat about.md

I'm a senior web developer doing non-profit work in juvenile justice, a tai chi teacher in-training, and a homeschool mom to a couple of wonderful children.

@heyloura: ~ $

@heyloura@heyloura.com

micro.blog 🔗
diamond-ring
webrings.md

@heyloura@heyloura.com

html
tai-chi.html
html
homeschool.html

@heyloura@heyloura.com

@heyloura: ~/socials cat webrings.md
@heyloura: ~/socials $